

Best Shower Enclosure Wall Panels 2026
Table of Contents
- Top Shower Enclosure Wall Panels for 2026: Quick Comparison
- Material Comparison: Acrylic vs PVC Shower Panels
- How to Install Shower Wall Panels: DIY vs Professional
- Best Adhesives for Shower Panels: Waterproofing and Durability
- Waterproofing and Moisture Resistance Standards
- Maintenance, Cleaning, and Long-Term Sealant Care
- Design Trends and Aesthetic Options for 2026
- Cost Analysis and Budget Considerations
Last Updated: August 27, 2026
Top Shower Enclosure Wall Panels for 2026: Quick Comparison
Choosing the right shower enclosure wall panels transforms your bathroom from dated and damp to modern and functional. The market has shifted toward waterproof, grout-free alternatives that are easier to install and maintain than traditional ceramic tiles. At Wetwall Wonders, we offer solutions for homeowners, installers, and designers tackling bathroom renovations.
The panels you select determine how long your shower stays watertight, how much time you spend cleaning, and whether you're doing this yourself or calling in a professional. Get this wrong, and you're dealing with mould and peeling edges within 18 months. Get it right, and your bathroom stays pristine for years with minimal effort.
Below, we discuss materials, installation methods, waterproofing standards, and cost trade-offs for shower enclosure wall panels. Whether you're a DIY homeowner, a bathroom fitter, or a designer specifying finishes, you'll find information to help you choose correctly.
Material Comparison: Acrylic vs PVC Shower Panels
PVC dominates the market for good reason. It's non-porous, meaning water can't penetrate the surface and cause the swelling or degradation you see with some acrylic panels over time. PVC also handles impact better; a dropped shampoo bottle won't crack it. Acrylic offers a warmer finish but requires careful handling and degrades faster under constant moisture exposure.
Laminate sits between the two but introduces risk: the bond between layers can fail if water reaches the edges, requiring meticulous sealant work around trims.
The Decorwall Maxi Panel range uses premium PVC construction with UV protection and a 5-year guarantee. These 10mm-thick panels resist warping and discolouration. For comparison, 8mm panels are adequate for small spaces but show flex under pressure.
Large-format panels (900mm width) reduce seams and therefore reduce potential water ingress points. The Decorwall Elegance Ultimo Tile Cleveland at 500mm width balances visual impact with practical installation in standard bathrooms. For narrow ensuites, the 250mm Decorwall Elite Print Arctic Grey eliminates awkward gaps.
| Panel Type | Thickness | Seam Count (per 2.4m wall) | Water Resistance | Best For |
|---|---|---|---|---|
| PVC (large-format) | 10mm | 2-3 | Excellent | Primary showers, high-moisture areas |
| PVC (standard) | 8-9mm | 4-5 | Very Good | Most bathrooms, secondary showers |
| Acrylic | 5-8mm | 4-5 | Good | Feature walls, low-moisture areas |
| Laminate | 8mm | 4-5 | Fair | Budget installations, short-term use |
How to Install Shower Wall Panels: DIY vs Professional
Installing shower wall panels yourself is feasible if you understand the two core methods and choose the right adhesive. Most DIY installations require careful surface preparation.
Installation Over Existing Tiles
This method works only if your existing tiles are firmly bonded and completely dry. Tap each tile with a rubber mallet; if any sound hollow, that tile must be removed first. Damp tiles will trap moisture behind new panels, breeding mould invisibly.
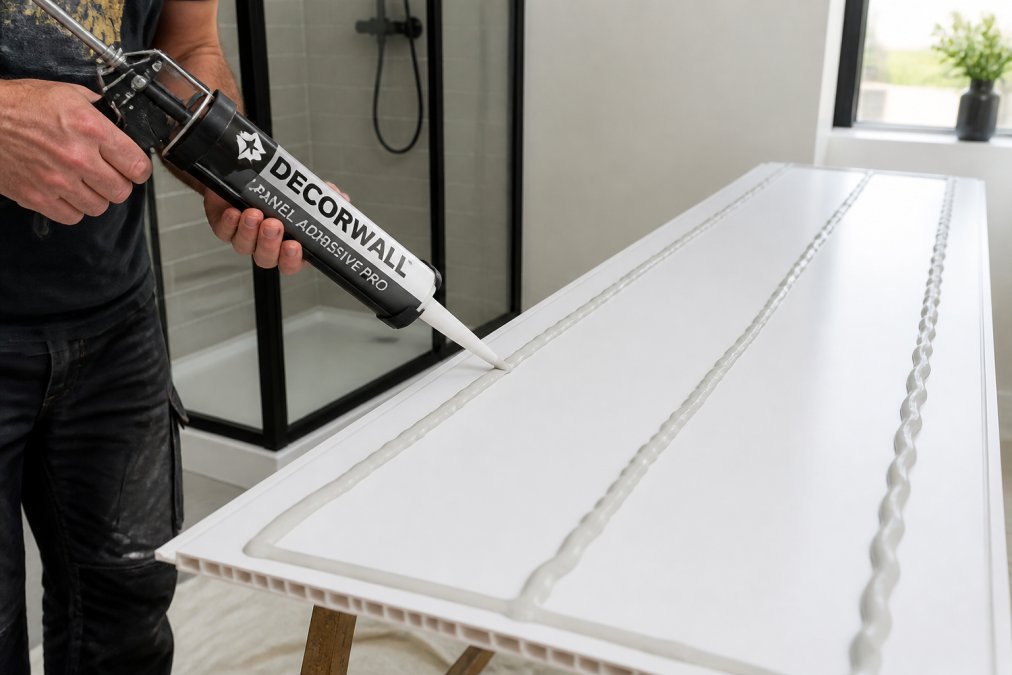
Clean the tile surface thoroughly with a degreaser, then sand it lightly to improve adhesive grip. Apply Decorwall Panel Adhesive Pro (£9.00 for 310ml) in a continuous bead along the back of each panel. The adhesive sets in 1 hour and cures fully in 24 hours. Press each panel firmly for 30 seconds to ensure contact.
For DIY installers, this method reduces the risk of hitting pipes or electrical wiring hidden behind plasterboard. The downside is adhesive coverage; you're relying entirely on the bond between panel and tile, which is only as strong as the tile's attachment to the wall beneath.
Direct-to-Wall Installation
Installing directly to plasterboard requires removing any existing tiles and ensuring the wall is completely flat and dry. Use a spirit level to check for high spots; anything over 3mm will create gaps behind the panels, trapping moisture.
Apply adhesive to the wall itself in a grid pattern: a bead around the perimeter and three vertical lines across the middle. This approach gives better control over adhesive coverage and makes it easier to adjust panel position before it sets.
Direct-to-wall installation is faster for professionals but riskier for DIY because you're exposed to whatever's behind the plasterboard. Use a pipe and cable detector before you start.
Best Adhesives for Shower Panels: Waterproofing and Durability
The adhesive you choose determines whether your panels stay bonded or start peeling within a year. Decorwall Panel Adhesive Pro is specifically formulated for internal panel installation, with a water-based formula that cures to a flexible bond. This flexibility matters: as temperature and humidity fluctuate, panels expand and contract slightly. A rigid adhesive cracks; a flexible one moves with the panel.
Apply adhesive in a continuous bead, not dots. Dots leave air pockets that trap moisture. For large panels (900mm width), use approximately 40-50ml of adhesive per panel.
The 1-hour set time and 24-hour full cure means you can install multiple panels in sequence throughout a day, but don't use the shower until full cure is complete.
For sealant around edges and trims, use high-quality silicone (not acrylic caulk, which degrades in wet environments). Silicone stays flexible as the building moves and resists mould better. Reapply sealant every 2-3 years as part of maintenance.
Waterproofing and Moisture Resistance Standards
Modern shower enclosure wall panels meet strict waterproofing standards. "100% waterproof" means the material itself won't absorb water. However, waterproofing a shower enclosure is about the entire system: panels, adhesive, sealant, and trims working together.
The weak point is always the seams. Each seam where two panels meet is a potential entry point for water. Large-format panels (900mm width) are superior to narrow panels in high-moisture areas; fewer seams means fewer vulnerabilities. However, narrow panels excel in tight spaces where seam placement is less critical.
A properly installed shower enclosure with quality sealant and adhesive can remain dry behind the panels for an extended period before sealant degradation requires reapplication.
Panels meeting BS 2750 standards for bathroom fixtures have undergone rigorous moisture resistance testing. Wetwall Wonders products carry UK fire ratings and UV protection certifications, indicating compliance with building safety standards.
Maintenance, Cleaning, and Long-Term Sealant Care
PVC panels shine compared to ceramic tiles. Tiles require grout maintenance; grout cracks, absorbs moisture, and grows mould. PVC panels have no grout. A simple wipe with warm water and mild detergent keeps them looking new.
For stubborn soap scum or hard water deposits, use a non-abrasive bathroom cleaner and a soft cloth. Never use scouring pads or abrasive powders, which scratch the surface and create micro-damage where moisture can infiltrate.
Sealant is where maintenance effort concentrates. Check the silicone seal around panel edges every 6 months. If you notice the sealant pulling away, cracking, or showing dark discolouration (mould), it's time to replace it.
Resealing is straightforward: remove the old sealant with a caulk removal tool, clean the gap thoroughly, and apply fresh silicone. Allow 48 hours cure time before exposing to water.
Most homeowners need to reseal once every 2-3 years depending on water hardness and humidity levels. Bathroom ventilation matters; a well-ventilated bathroom with lower humidity extends sealant life significantly.
The Kerradeco Stone Grey panels come with detailed maintenance guidance specific to their material composition. Their natural texture finish hides minor marks better than high-gloss finishes.

Design Trends and Aesthetic Options for 2026
Stone-effect and natural texture finishes dominate 2026 bathroom design. Matte and textured surfaces are gaining ground because they feel more contemporary and hide water spots better than gloss.
Tile-effect panels have evolved beyond obvious imitations. The Decorwall Elegance Ultimo Tile Cleveland uses HD print technology to replicate authentic tile appearance without grout maintenance. Slatwall is emerging as a secondary option for feature walls. The Thermo-Slat Smoke Grey panels add visual interest and acoustic benefits while maintaining waterproofing, though they're not suitable for primary shower walls.

Narrow panels (250mm width) are trending in minimalist bathrooms. The Decorwall Elite Print Arctic Grey creates a linear, contemporary look that feels intentional rather than budget-constrained.
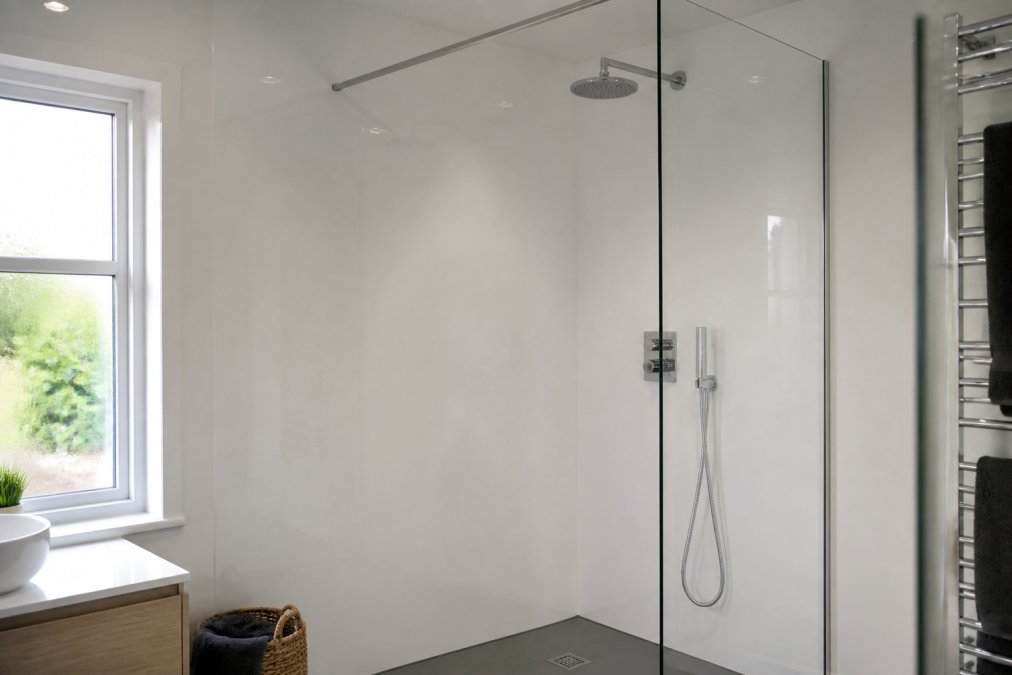
Colour trends have shifted toward warm neutrals and soft greys. Arctic grey, beige marble, and antique marble finishes are appearing in design-forward projects. Sustainability is influencing material choices. Panels with recycled PVC content and lead-free formulations appeal to environmentally conscious homeowners. According to recent research on sustainable building materials, 62% of new bathroom projects now prioritise eco-friendly specifications.
Cost Analysis and Budget Considerations
Panel costs range from £3.95 per pack (Dumawall+ High Gloss Mura) to £209.00 (Kerradeco Stone Grey). The price difference reflects material quality, thickness, print technology, and warranty coverage.
For a standard 2.4m x 2.4m bathroom wall, you'll need approximately 2.4-3 square metres of coverage depending on panel width.
Budget Option: Dumawall+ High Gloss Mura covers 1.95m² per pack. Two packs (£7.90 total) plus adhesive (£9.00). Total: under £20 for materials. Labour (if professional): additional costs apply.
Mid-Range Option: Decorwall Elite Print Arctic Grey (£11.00) or Decorwall Elegance Mineral Calcite (£22.00). Three panels at £33-66 plus adhesive (£9.00). Total materials: £45-80. Labour: additional costs apply.

Premium Option: Decorwall Maxi Panel Gloss White (£59.00) or Beige Marble (£54.00). Two panels plus adhesive (£9.00). Total materials: £120-130. Labour: additional costs apply.
Labour cost can be a significant part of the total project cost. Material differences between budget and premium options are modest compared to potential labour costs. This means choosing the right panel for your space matters more than choosing the cheapest option.
DIY installation saves on labour but requires your time and carries the risk of mistakes. Sealant and trim materials add £30-60 to any project. These are non-negotiable costs; skimping here is where installations fail.
According to Which? research on bathroom renovation costs, wall panel installation represents 15-20% of total bathroom renovation spend. Choosing panels wisely optimises this line item without compromising overall project quality.
Choosing shower enclosure wall panels correctly means understanding your space, your skill level, and what waterproofing actually requires. The best panels for a tight ensuite differ from the best for a spacious family bathroom. The best adhesive is only as good as the surface preparation. And the best design choice is one you'll still appreciate in five years when you're wiping down the same panels and they still look pristine.
Wetwall Wonders supplies everything you need in one place: panels in multiple sizes and finishes, specialist adhesives, silicones, and trims. Rather than sourcing from three different suppliers, you get a complete system designed to work together. Start with the panel that matches your space and aesthetic, add the right adhesive and sealant, and you've got the foundation for a shower enclosure that lasts. Search our full range and get started.
=== FAQ ANSWERS (audit these too, same rules) ===
[1] Q: What are the best shower enclosure wall panels to use for a waterproof finish? A: The best shower enclosure wall panels are 100% waterproof PVC options with 8-10mm thickness. Decorwall Maxi Panels (10mm, £54-59) and Decorwall Elite Print (8mm, £11) both offer complete waterproofing with tongue-and-groove designs that eliminate grout lines. Pair them with Decorwall Panel Adhesive Pro (£9) and silicone trim for a sealed, moisture-resistant finish that prevents water ingress behind the panels.
[2] Q: Are shower wall panels easier to install than traditional tiles? A: Yes. Shower wall panels install significantly faster than ceramic tiles. No grouting is required, and tongue-and-groove designs click together easily. You'll need basic tools, adhesive, and trim pieces. Many homeowners complete DIY installations without professional help, though tight spaces (narrow ensuites) may require careful measurement to avoid gaps.
[3] Q: How do acrylic shower panels compare to PVC shower panels? A: PVC panels generally outperform acrylic in most areas. PVC is more durable, resistant to impact, and maintains colour better under UV exposure. Both are 100% waterproof, but PVC offers superior stain resistance and easier cleaning. PVC panels also come in more design options, tile effects, stone finishes, and gloss surfaces. Acrylic is lighter and slightly cheaper, but PVC's longevity and lower maintenance make it a strong option for shower enclosures.
[4] Q: What thickness of shower panel is recommended for enclosures? A: For shower enclosures, 8-10mm thickness is standard. The Decorwall Maxi Panel (10mm) provides maximum rigidity and durability, ideal for larger wall areas. The Decorwall Elite Print (8mm) works well for smaller spaces and tight ensuites where slimline profiles are preferred. Thinner panels (5mm) are acceptable for low-traffic areas, but 8-10mm ensures long-term stability and resistance to warping in humid bathroom environments.
[5] Q: How do I prevent water damage and mould behind shower wall panels? A: Proper installation is critical. Use a moisture barrier adhesive like Decorwall Panel Adhesive Pro, which cures in 24 hours and creates a waterproof bond. Seal all joints and trim edges with silicone, this prevents water seeping behind the panels. Ensure your shower tray or floor has adequate drainage. Ventilate your bathroom regularly to reduce humidity. Grout-free panel designs eliminate the mould-prone crevices found in traditional tiles, making maintenance simpler and long-term moisture issues less likely.
Frequently Asked Questions
What are the best shower enclosure wall panels to use for a waterproof finish?
The best shower enclosure wall panels are 100% waterproof PVC options with 8-10mm thickness. Decorwall Maxi Panels (10mm, £54-59) and Decorwall Elite Print (8mm, £11) both offer complete waterproofing with tongue-and-groove designs that eliminate grout lines. Pair them with Decorwall Panel Adhesive Pro (£9) and silicone trim for a sealed, moisture-resistant finish that prevents water ingress behind the panels.
Are shower wall panels easier to install than traditional tiles?
Yes. Shower wall panels install significantly faster than ceramic tiles. No grouting is required, and tongue-and-groove designs click together easily. You'll need basic tools, adhesive, and trim pieces. Many homeowners complete DIY installations without professional help, though tight spaces (narrow ensuites) may require careful measurement to avoid gaps.
How do acrylic shower panels compare to PVC shower panels?
PVC panels generally outperform acrylic in most areas. PVC is more durable, resistant to impact, and maintains colour better under UV exposure. Both are 100% waterproof, but PVC offers superior stain resistance and easier cleaning. PVC panels also come in more design options, tile effects, stone finishes, and gloss surfaces. Acrylic is lighter and slightly cheaper, but PVC's longevity and lower maintenance make it a strong option for shower enclosures.
What thickness of shower panel is recommended for enclosures?
For shower enclosures, 8-10mm thickness is standard. The Decorwall Maxi Panel (10mm) provides maximum rigidity and durability, ideal for larger wall areas. The Decorwall Elite Print (8mm) works well for smaller spaces and tight ensuites where slimline profiles are preferred. Thinner panels (5mm) are acceptable for low-traffic areas, but 8-10mm ensures long-term stability and resistance to warping in humid bathroom environments.
How do I prevent water damage and mould behind shower wall panels?
Proper installation is critical. Use a moisture barrier adhesive like Decorwall Panel Adhesive Pro, which cures in 24 hours and creates a waterproof bond. Seal all joints and trim edges with silicone, this prevents water seeping behind the panels. Ensure your shower tray or floor has adequate drainage. Ventilate your bathroom regularly to reduce humidity. Grout-free panel designs eliminate the mould-prone crevices found in traditional tiles, making maintenance simpler and long-term moisture issues less likely.
This article was written using GrandRanker

