
Are Acrylic Shower Panels Worth It? 2026 Review
Table of Contents
- The Verdict: When Acrylic Shower Panels Make Sense
- Acrylic vs PVC Bathroom Wall Panels: What's the Real Difference?
- The Cost of Bathroom Wall Panels vs Tiling: A Full Breakdown
- How to Install Shower Wall Panels: DIY vs Professional
- Durability and Lifespan: How Long Do Acrylic Panels Last?
- Waterproofing, Mould Resistance, and Structural Integrity
- Impact on Resale Value and Aesthetic Appeal
- Frequently Asked Questions
Last Updated: September 24, 2026
The Verdict: When Acrylic Shower Panels Make Sense
Acrylic shower panels are worth it for most home renovations because they deliver a waterproof, low-maintenance surface. They suit quick refreshes, rental properties, and busy family bathrooms particularly well. This guide from Wetwall Wonders breaks down the real costs, durability, and installation trade-offs so you can decide with confidence.
Acrylic vs PVC Bathroom Wall Panels: What's the Real Difference?
The main difference between acrylic and PVC bathroom wall panels comes down to surface feel, thickness, and how they handle impact. Acrylic panels have a glossier, warmer finish. PVC panels are lighter, cheaper, and easier to cut with basic tools.
Material Composition and Feel
Acrylic panels are made from a rigid plastic sheet with a smooth, non-porous surface. They feel solid to the touch and hold a high-end finish well. PVC panels, such as the Decorwall Elite Print in Sandstone, use a UPVC core that stays hygienic and 100% waterproof.

Cost and Durability Compared
PVC usually costs less upfront and suits budget-friendly projects. Acrylic costs more. Both are maintenance-free compared to grout.
| Feature | Acrylic Panels | PVC Panels |
|---|---|---|
| Surface feel | Glossy, warm | Matte to gloss |
| Impact resistance | High | Moderate |
| Typical cost | Higher | Lower |
| Best for | Forever homes | Rentals, quick flips |
The Cost of Bathroom Wall Panels vs Tiling: A Full Breakdown
Bathroom wall panels usually cost less than tiling once labour is included, because installation is faster and needs no grouting. The upfront material price can look similar, but the total project cost favours panels in most renovations.
Upfront Material Costs
At Wetwall Wonders, panels start at £11.00 for the Decorwall Elite Print Sandstone and £54.00 for the Decorwall Maxi Beige Marble. A full pack like Kerradeco Stone Grey is £209.00 and covers 3.186 m². Tiles vary widely, but you also pay for adhesive, grout, spacers, and sealer.

Hidden Labour and Long-Term Costs
Grout needs sealing and re-cleaning over the years. Panels wipe clean and skip that ongoing cost entirely.
- Material: panels often cheaper per m²
- Labour: panels install in a fraction of the time
- Maintenance: no regrouting, no resealing
- Repairs: single panels can be replaced
GOV.UK guidance on home improvement and renovation
How to Install Shower Wall Panels: DIY vs Professional
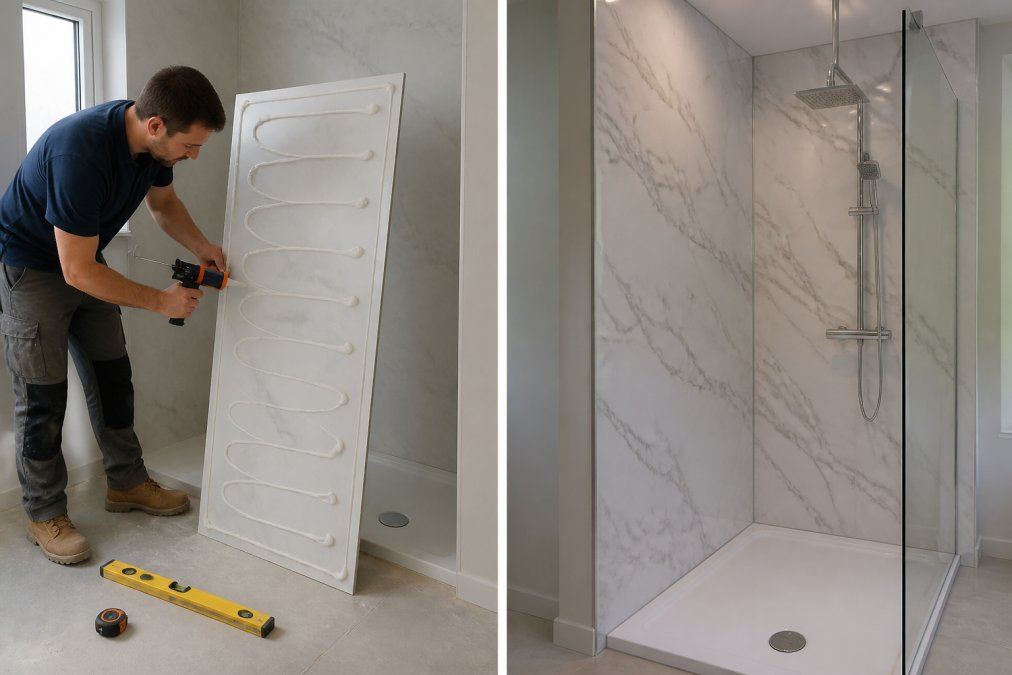
Most homeowners can install shower wall panels themselves in a weekend using adhesive and a tongue-and-groove fit. Professional installation suits larger wet rooms, uneven walls, or anyone short on time. The real question is not whether DIY is possible, it is whether your walls and plumbing are ready for it.
The DIY Installation Process
- Measure the wall and plan panel layout, allowing for trims and corner profiles
- Strip the old surface back to a sound, dry substrate, never panel over flaking tile or damp plaster
- Check the wall is plumb and flat; pack out any hollows with a suitable backing board
- Apply the specified adhesive in vertical beads, not blobs, so panels sit flat
- Click panels together using tongue and groove, working away from the most visible corner
- Seal edges and corners with a neutral-cure silicone, not a general-purpose sealant
- Fit trims and allow the adhesive to cure fully before the first shower
Where DIY Installations Commonly Fail
A common pattern among failed DIY fits is not the panel itself but what sits behind and around it. Three mistakes account for most callbacks:
- Panelling over a damp or uneven substrate. The panel looks fine for months, then bows or lifts as trapped moisture expands. If the wall is not dry and flat, fix that first.
- Using the wrong adhesive or silicone. Acrylic and PVC panels need sealants that stay flexible and bond to plastic. A rigid or acetic-cure silicone can attack the panel edge and crack at the joint.
- Skipping the moisture barrier at the tray and valve. Water tracks behind the panel at the shower tray upstand and around the valve cut-out. These are the two points where leaks actually start.
When to Call a Professional
Call a fitter if walls are out of square, plumbing needs moving, or you're building a full wet room. Compatibility with existing fixtures matters, so check tray and valve positions before ordering.
Retrofitting Around Existing Plumbing
This is the pain point most guides skip. A shower valve, shower head outlet, or bath filler can usually be accommodated, but the sequence matters:
- Offer the panel up dry and mark the valve centre before cutting.
- Use a hole saw sized to the valve body, then seal the cut edge with silicone before fitting the trim.
- For a concealed valve, the panel must sit flush against the wall so the trim plate seals evenly. A panel standing off the wall on thick adhesive beads will not seal.
- If the valve needs to move, do that before panelling. Cutting a panel twice is far harder than moving a pipe once.
Durability and Lifespan: How Long Do Acrylic Panels Last?
Lifespan depends on panel thickness, substrate condition, and sealing quality.
Waterproofing, Mould Resistance, and Structural Integrity
A non-porous surface with sealed joints leaves nowhere for moisture to sit, which cuts mildew risk and protects the backing wall. But the panel is only half the system, the substrate behind it decides whether the installation lasts five years or fifteen.
Why the Backing Wall Matters More Than the Panel
Acrylic and PVC panels are 100% waterproof by nature. The weak points are the joints, edges, and any penetration, the shower valve, the tray upstand, the corner where two panels meet. When one of those fails, water does not sit on the panel face. It tracks down the back of the panel and into the substrate.
- Moisture-resistant plasterboard or tile backer board tolerates occasional damp and dries out. This is the sensible substrate for a panelled shower.
- Standard plasterboard or bare plaster softens, loses its key, and can delaminate. By the time the panel shows a bulge or a soft spot, the board behind it is usually beyond saving.
- Timber studs and sole plates are the slow-burn risk. Repeated wetting and drying cycles cause swelling and, over years, rot. This is the failure mode that turns a cosmetic repair into a strip-out.
Getting the Waterproofing Layer Right
- Use silicone at every joint, corner, and penetration, and tool it smooth so it bonds fully.
- Check the moisture barrier or tanking membrane before fitting, especially in a wet room or over a timber floor.
- Leave a small expansion gap at edges and cover it with a trim rather than butting panels tight to the ceiling or tray.
- Re-seal annually in wet rooms and after any plumbing work that disturbs a joint.
- If you are panelling over existing tiles, confirm they are firmly bonded and the wall behind them is dry. Panelling over a failing tiled wall simply hides the problem.
Mould and Damp in the Wider Room
Panels remove the grout lines that harbour mould, but they do not remove the need for ventilation. A sealed shower enclosure with no extractor will still grow mould on the ceiling, the silicone, and the window reveals. Run an extractor fan sized to the room, or open a window, and wipe down the silicone line weekly in heavy-use bathrooms.
NHS advice on preventing damp and mould at home
Impact on Resale Value and Aesthetic Appeal
Wall panels can support resale value by presenting a clean, modern bathroom that buyers read as low-maintenance. Aesthetic appeal matters more than the material name, so finish choice drives the impression.
| Renovation Goal | Best Panel Choice | Why |
|---|---|---|
| Rental refresh | Decorwall Elite Print | Low cost, quick fit |
| Family bathroom | Decorwall Maxi Misty Stone | Durable, 5-year guarantee |
| Feature wall | Dumawall+ High Gloss Mura | Tile effect, 10-year warranty |
| Full wet room | Kerradeco Stone Grey | 3.186 m² coverage per pack |
Frequently Asked Questions
What are the downsides of acrylic shower panels?
Acrylic panels can be more expensive upfront than basic PVC options, though they often cost less than a full tile installation. They can scratch if cleaned with abrasive pads, so a soft cloth is best. Also, if the backing wall isn't flat, the panels may show imperfections. Finally, while they are durable, they may not add the same property value as a high-end ceramic tile finish in a premium home.

How do acrylic shower panels compare to PVC or tile?
Acrylic panels offer a thicker, glossier finish than standard PVC and feel more like glass. They are warmer to the touch than tile and have no grout lines, making them easier to clean. PVC is generally cheaper and thinner, while tile provides a classic look but requires more maintenance. For a balance of aesthetics and low upkeep, acrylic is a strong middle ground.
Can you install acrylic panels over existing tiles?
Yes, many acrylic panels can be installed directly over existing tiles, provided the surface is clean, dry, and flat. This saves the time and mess of removing old tiles. However, if the tiles are loose or the wall is uneven, you may need to strip them back first. Using the correct adhesive is critical for a secure bond.
Do acrylic shower panels require professional installation?
Not necessarily. Many homeowners successfully install them as a DIY project, especially with tongue-and-groove systems. However, if you are unsure about cutting around pipes or achieving a watertight seal, a professional fitter is recommended. Proper sealing with silicone is the most important step to prevent leaks.
Acrylic shower panels are worth it for most renovations, but the choice hinges on your goal, budget, and how much design flexibility you need. Wetwall Wonders supplies a full range of wall panels, from 250mm and 300mm sizes to the Dumawall tile effect and Linerio slatwall, plus the silicones, adhesives, and trims to finish the job in one order. Get started with Wetwall Wonders and transform your bathroom with a waterproof, low-maintenance surface built to last.

