
Best Sealant for Shower Wall Panel Edges
Table of Contents
- Why Sealant Choice Matters for Shower Wall Panels
- Silicone Sealant Versus Caulk for Panel Edges
- How to Seal Shower Panel Edges Properly
- Mould-Resistant Bathroom Silicone: What Works
- Silicone Sealant Curing Time and Shower Readiness
- Choosing the Right Shower Panel Adhesive
- Common Mistakes and Failure Diagnosis
- Frequently Asked Questions
Last Updated: October 20, 2026
Why Sealant Choice Matters for Shower Wall Panels
Finding the best sealant for shower wall panel edges is the difference between a watertight bathroom and one where water creeps behind panels, causing mould, structural damage, and costly repairs.
Shower wall panels create permanent seams at the tray, corners, and tile or bath junctions.
The best sealant for shower wall panel edges does three things: stays flexible as the building shifts, resists mould in high humidity, and adheres reliably to both panel and substrate.
This guide covers the sealants that work, the mistakes that cause failures, and how to apply them for a decade or more of protection.
Silicone Sealant Versus Caulk for Panel Edges
Silicone and caulk are not interchangeable, and using the wrong one is a common mistake.
Silicone sealant stays permanently flexible, expanding and contracting with temperature swings and structural movement, so it won't crack or peel as the substrate shifts.

Caulk, by contrast, hardens as it cures. Acrylic caulk is paintable and cheap but becomes brittle; temperature swings crack it and water penetrates. Silicone caulk is often confused with silicone sealant, but true silicone sealant is the professional choice for wet areas.
For shower panel edges, silicone sealant is non-negotiable. Caulk will fail within months in a high-moisture environment.
How to Seal Shower Panel Edges Properly
Application technique determines whether your sealant lasts or fails.
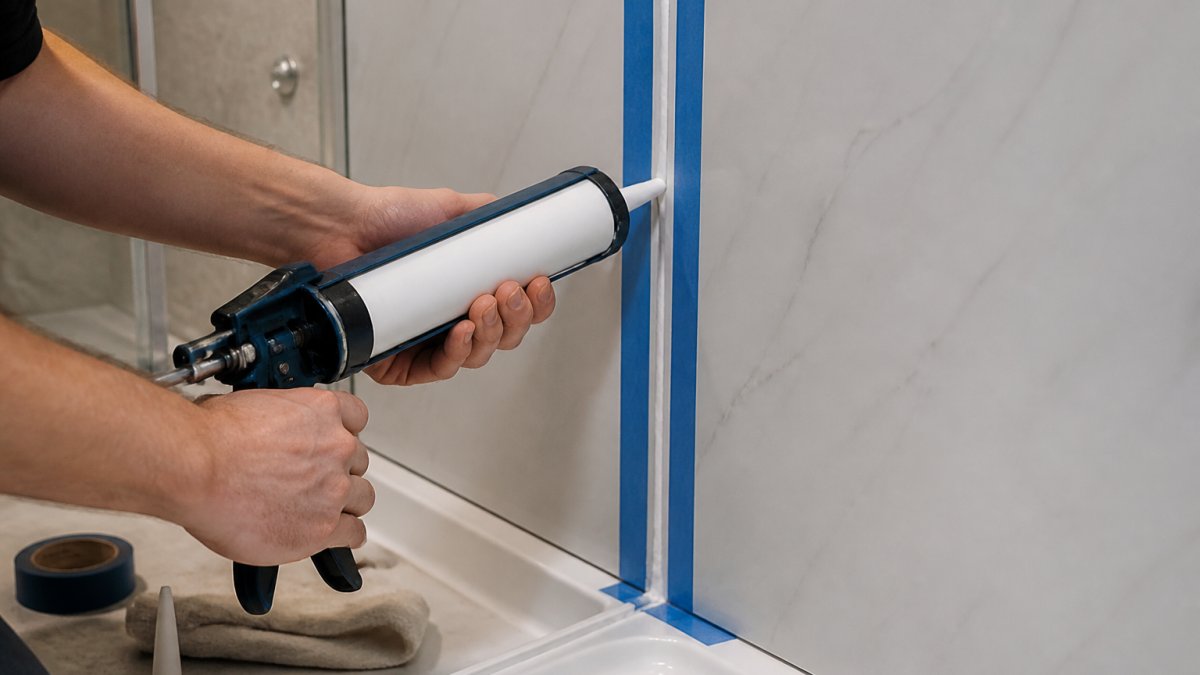
Mask both sides of the joint with painter's tape roughly 3mm from the edge. A neat bead looks professional and performs better; sealant spread too thin or too wide fails faster.
Cut the nozzle at a 45-degree angle (a smaller opening gives better control) and apply steady pressure in one continuous motion.
Immediately tool the bead with a wet finger or plastic tool, pressing it into any voids and creating a concave profile that sheds water.
Remove the masking tape while the sealant is still wet, typically within 10-15 minutes; once cured, the tape will tear the bead.
Mould-Resistant Bathroom Silicone: What Works
Standard silicone sealant does not resist mould; in a shower, mould colonises the surface within weeks, which is unsightly and signals the sealant is compromised.
Mould-resistant silicone includes a fungicide additive that prevents mould growth on the sealant surface, essential for showers. It does not stop water penetration behind the sealant, only mould on the exposed bead, so it is no substitute for a properly filled joint, correct adhesion, or a dry substrate.
How the fungicide actually works, and where it stops working
The additive migrates slowly to the surface and suppresses mould on the bead itself, but it does not treat mould already growing in the cavity, tray upstand, or substrate. It also depletes over time, most bathroom silicones stay effective for several years, but standing water, poor ventilation, and soap scum shorten that window. Black spotting typically returns at the tray junction first, where water sits longest.
Pair mould-resistant silicone with ventilation and a routine wipe-down: the sealant is surface defence, not cavity defence.
Acetoxy versus neutral-cure: which one belongs at a panel edge
Most mould-resistant bathroom silicones are acetoxy-cure, releasing acetic acid as they set, the vinegar smell. They cure quickly, grab well on vertical joints, and are inexpensive, but the acid can corrode unprotected metals (chrome trims, brass fittings, some mirror backings) and attack acid-sensitive surfaces.
Neutral-cure silicones release an alcohol or oxime by-product instead, gentler on metals and sensitive substrates, lower odour, and often specified by panel manufacturers for coated or laminated edges. They cure more slowly and cost more per cartridge.
For a standard panel-to-tray joint against plastic or glazed surfaces, acetoxy with fungicide is the practical choice. Against chrome, mirrors, natural stone upstands, or coated composite edges, check the panel instructions first, many specify neutral-cure.
Matching the sealant to the panel material
Sealant choice varies by panel type:
- PVC and acrylic panels: generally compatible with both acetoxy and neutral-cure silicones. Acetoxy is fine on the panel face; keep it off any chrome trim.
- Laminate and composite panels: the cut edge and any coating are the risk. Some laminates and coated composites are sensitive to acetic acid at the exposed edge. Check the manufacturer's approved sealant list before using acetoxy.
- Panel-to-tray junctions: the tray material matters as much as the panel. Acrylic trays and enamelled steel are usually fine with acetoxy; natural stone and some composite trays are not.
The panel's approved sealant list overrides generic advice; using an unapproved sealant can void the warranty even if the bead performs perfectly.
Our GP200 General Purpose Silicone Sealant is fungicide-formulated for bathroom and shower use. Acetoxy-cure, it sets quickly on vertical joints without sagging, and at £24.00 for three cartridges it is cost-effective for multiple panel edges. It suits PVC and acrylic panel edges against plastic or glazed surfaces; for chrome, coated composite, or natural stone, check the instructions or step up to neutral-cure.
Silicone Sealant Curing Time and Shower Readiness
Using the shower before the sealant has fully cured is a common mistake; premature water exposure causes adhesion failure and lets water behind the panels.
Acetoxy silicone shows surface set within 30 minutes to 1 hour, dry to the touch, but surface set is not full cure; the sealant is still soft and vulnerable to water penetration.
GP200 General Purpose Silicone Sealant (Pack of 3) →
Full cure, maximum hardness, flexibility, and water resistance, takes 7 days for acetoxy formulas, as the sealant keeps releasing acetic acid and hardening throughout its depth.
Most manufacturers recommend 24 hours before light splashing and 7 days before normal shower use, seal on a Monday, shower the following Monday.
This is a hard rule. Rushing it is why seals fail.
| Curing Stage | Time | Water Exposure |
|---|---|---|
| Surface set | 30 mins-1 hour | None |
| Light handling | 2-4 hours | None |
| Light water exposure | 24 hours | Splashing only |
| Full cure | 7 days | Normal shower use |
Why the 7-day figure is a rule of thumb, not a guarantee
Cure time depends on how fast the sealant loses its by-product through the exposed surface. The figures above assume a 5-8mm bead in a ventilated bathroom at room temperature; change any of those and the schedule moves:
- Deeper or wider joints cure more slowly because the by-product has further to travel. A 10mm-deep joint at a tray upstand can take noticeably longer than a thin bead along a panel edge.
- Cold conditions slow the cure. Below about 10°C, acetoxy silicones can take considerably longer to reach full cure; avoid sealing in an unheated bathroom in winter if you can.
- High humidity slows the loss of by-product and extends cure time. Ventilate thoroughly and allow extra time.
- Neutral-cure silicones generally cure more slowly than acetoxy, so add time if you have stepped up to neutral-cure for a chrome or composite edge.
In winter or a very humid bathroom, add an extra day or two; if in doubt, err on the side of longer.
How to test readiness before first use
You cannot tell full cure by touch alone, the surface sets long before the depth does. Two practical checks:
- The press test. Press a fingernail into an inconspicuous part of the bead. If it leaves a permanent dent, the sealant is still soft underneath; wait longer.
- The smell test. Acetoxy silicone smells of vinegar while it is still releasing acetic acid. When the vinegar smell has gone from the bathroom, curing is essentially complete. Neutral-cure has a milder, different odour that also fades as it sets.
Neither test replaces the stated cure time, but both catch the common case where the surface looks ready and the depth is not.
Curing and the rest of the installation
Sealant cure is not the only clock running. Hybrid polymer adhesive also needs to cure before water exposure, typically 24 hours for handling strength and up to 7 days for full strength. Do not shower until both have fully cured, and where the manufacturer specifies a cure time, that figure takes precedence.
Choosing the Right Shower Panel Adhesive
Sealant seals joints. Adhesive bonds panels to the wall or substrate. These are different products with different jobs.
For shower wall panels, you need an adhesive that:
- Bonds reliably to the panel material (typically PVC, acrylic, or composite)
- Adheres to the substrate (tile, plasterboard, existing bath edge)
- Remains flexible after curing (rigid adhesives crack when the building moves)
- Resists water and humidity indefinitely
Our Decorwall Megabond Adhesive is a hybrid polymer formula built for this. At £9.00 per 295ml cartridge, it bonds glass, marble, brick, and panel materials without the brittleness of traditional tile adhesives, cures with flexibility intact, and even adheres under water.

Apply Megabond with a notched trowel or bead pattern depending on panel size and substrate; for wall panels, a continuous bead around the perimeter is standard.
Unlike sealant, adhesive must cure fully before water exposure: most hybrid polymers cure in 24 hours, with full strength at 7 days.
Common Mistakes and Failure Diagnosis
Understanding why seals fail helps you avoid the same mistakes.
Using non-flexible sealant. Caulk, acrylic sealants, and rigid adhesives crack as the building moves and temperature fluctuates. Cracks allow water penetration.
Insufficient surface preparation. Dust, soap residue, old sealant, and paint prevent adhesion, and the sealant peels away within weeks.
Skipping fungicide. Standard silicone grows visible mould within weeks as the surface is colonised; mould-resistant formulas prevent this.
Using the shower too soon. Premature water exposure disrupts curing and causes adhesion failure. Wait the full 7 days.
Mould on sealant means it wasn't fungicide-formulated; replace with mould-resistant silicone.
Water behind the panels means the sealant failed or was never properly applied.
Frequently Asked Questions
What is the best sealant for shower wall panel edges?
The best sealant for shower wall panel edges is a mould-resistant, acetoxy-cure silicone designed for high-humidity environments. Look for products with fungicide, permanent flexibility, and proven adhesion to both the panel material and the substrate. Acetoxy silicone cures faster than neutral-cure alternatives and offers excellent waterproofing. The GP200 General Purpose Silicone Sealant (£24.00 for a pack of 3) contains fungicide, is mould-resistant, and cures quickly, making it suitable for bathroom and shower applications where water exposure is constant.
How long should shower sealant take to cure before using the shower?
Acetoxy silicone sealants typically cure to the touch within 24 hours, but full water-exposure readiness usually requires 7 days. Always check the product instructions, as curing time varies by brand, humidity, and temperature. Applying the sealant in cooler conditions or high humidity can extend curing time. Rushing water exposure before the sealant is fully cured risks water penetration behind the panel, leading to mould growth and adhesive failure. For shower panel edges, waiting the full 7 days is the safest approach.
Is bathroom silicone suitable for sealing shower panel edges?
Yes, bathroom silicone is specifically formulated for shower panel edges. It must contain fungicide or mould inhibitor, offer permanent flexibility to accommodate joint movement, and bond reliably to both the panel material and the wall substrate. Bathroom silicones are designed to resist constant water exposure, humidity, and temperature fluctuations. However, not all bathroom silicones perform equally.
How do you prevent water getting behind shower wall panels?
Prevent water ingress by sealing every edge joint with mould-resistant silicone, ensuring clean, dry surfaces before application, and allowing full curing time before water exposure. Use masking tape on either side of the joint to create a neat bead and prevent silicone from spreading into gaps. Apply the sealant in a continuous bead with no breaks or voids. For panel-to-tray corners, use a hybrid polymer adhesive like Decorwall Megabond (£9.00) to bond panels to the substrate, then seal the visible edge with silicone. Proper surface preparation and complete coverage are essential to prevent moisture penetration.

