
Buy Bathroom Wall Panels Online UK: 2026 Guide
Table of Contents
- Why Bathroom Wall Panels Are Replacing Tiles in UK Homes
- Bathroom Wall Panels vs Tiles: Pros and Cons
- Panel Types, Sizes, and Finishes to Know Before You Buy
- How to Install Bathroom Wall Panels: Step-by-Step
- Bathroom Wall Panel Installation Cost: DIY vs Professional
- Durability, Maintenance, and Long-Term Troubleshooting
- Environmental Impact and Sustainability Considerations
- Conclusion
Last Updated: August 6, 2026
Why Bathroom Wall Panels Are Replacing Tiles in UK Homes
Bathroom wall panels are the fastest-growing alternative to ceramic tiling in UK home renovation. Traditional tiling involves grout lines that harbour mould, requires skilled installation, and takes multiple days to fit. Panels eliminate all three problems. PVC wall cladding and composite shower panels are 100% waterproof with no grout matrix for moisture to penetrate. A properly fitted panel wall, sealed with silicone sealant at all joints, creates a seamless finish tiles cannot match.
According to the NHS guidance on damp and mould in homes, mould exposure poses genuine health risks, particularly for people with respiratory conditions. Grout-free wall panelling eliminates the primary surface where bathroom mould takes hold. Decorative panels have also closed the aesthetic gap, with stone effects, marble prints, and wood-look finishes now replicating premium materials at a fraction of the cost.
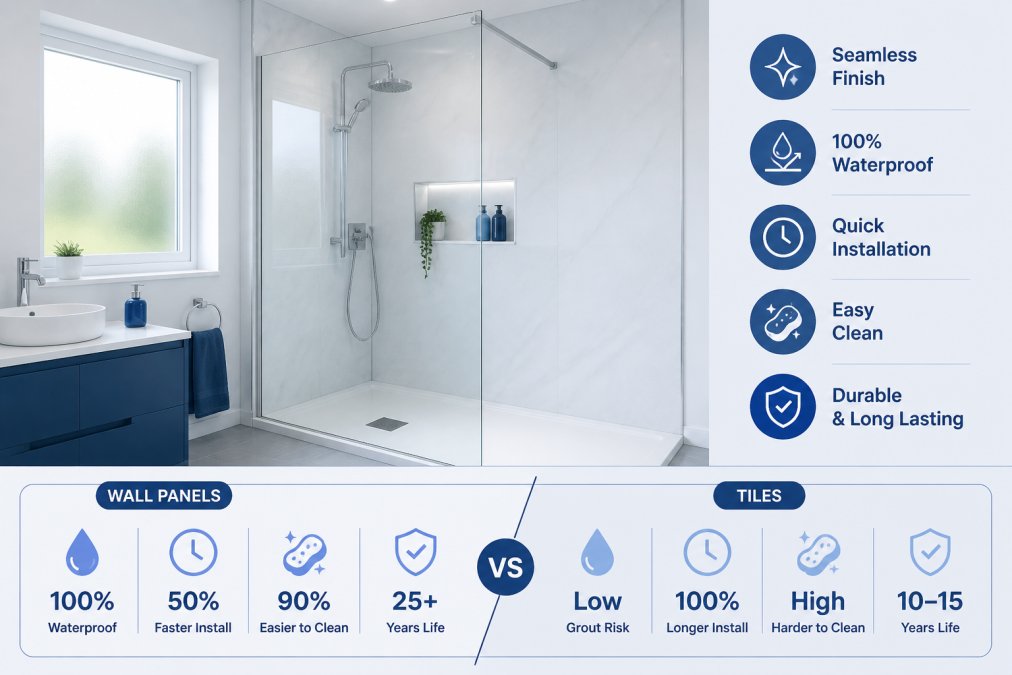
Bathroom Wall Panels vs Tiles: Pros and Cons
| Factor | Bathroom Wall Panels | Ceramic / Porcelain Tiles |
|---|---|---|
| Waterproofing | 100% waterproof (no grout) | Water-resistant (grout can absorb moisture) |
| Installation time | 1 day for most bathrooms | 2-4 days including grouting and drying |
| DIY suitability | High - no specialist tools required | Moderate - tile cutting and grouting require skill |
| Maintenance | Wipe clean, no re-grouting | Periodic grout cleaning and sealing required |
| Mould risk | Very low when correctly sealed | Higher, particularly in grout lines |
| Design range | Wide - marble, stone, wood, plain | Extensive but limited by tile size and grout colour |
| Longevity | 10-25 years depending on product | 20+ years with proper maintenance |
| Cost per m² (materials) | Generally lower to mid-range | Wide range from budget to premium |
Panels outperform tiles on waterproofing, installation speed, and long-term maintenance. Very high-end natural stone tiles retain a tactile quality that printed PVC cannot fully replicate, but for wet rooms, shower enclosures, and busy family bathrooms, panels win on practicality.
Panel Types, Sizes, and Finishes to Know Before You Buy
Material types:
- PVC wall cladding - lightweight, fully waterproof, the most common choice for shower panels and bathroom cladding
- Composite panels - denser, more impact resistant, often used in commercial wet rooms
- Acrylic-faced panels - high-gloss finish, typically used as splashback panels behind baths
Finish options cover virtually every interior design direction: marble effects, stone effects, plain matt colours, wood-effect slatwall, and geometric tile prints. UV stable finishes prevent colour fade in bathrooms with natural light. An 8mm panel suits most residential bathrooms; a 10mm panel offers greater rigidity for shower enclosures with daily use.
250mm and 300mm Tongue and Groove Panels for Tight Spaces
Narrow tongue and groove panels are ideal for small ensuites, cloakrooms, and tight spaces. The 250mm width, such as the Decorwall Elite Print in Arctic Grey (2700mm x 250mm x 8mm) at £11.00 per panel, allows precise fitting around obstacles. The tongue and groove system locks panels together without visible fixings, creating a continuous wall surface. The 300mm option, such as the Decorwall Elegance Mineral Calcite (300mm width) at £22.00 per panel, adds a stone effect suitable for contemporary bathrooms.


900mm Maxi Panels for Fast, Seamless Coverage
Where speed and seamless finish matter most, 900mm maxi panels are the professional's choice. The Decorwall Maxi Panel in Beige Marble (2400mm x 900mm x 10mm) at £54.00 covers 2.16m² per panel. The 10mm thickness delivers rigidity for daily use. For a standard 1800mm x 900mm shower enclosure back wall, a single panel covers the entire surface. The Decorwall Maxi Panel in Matt Misty Stone (2400mm x 900mm x 10mm) at £59.00 offers the same dimensions with a matte stone finish. Fewer panels mean fewer joints and fewer potential points of water ingress.

How to Install Bathroom Wall Panels: Step-by-Step
Installing bathroom wall panels is achievable for a competent DIYer but requires methodical preparation. Rushing the substrate stage is the single most common cause of panel failure.
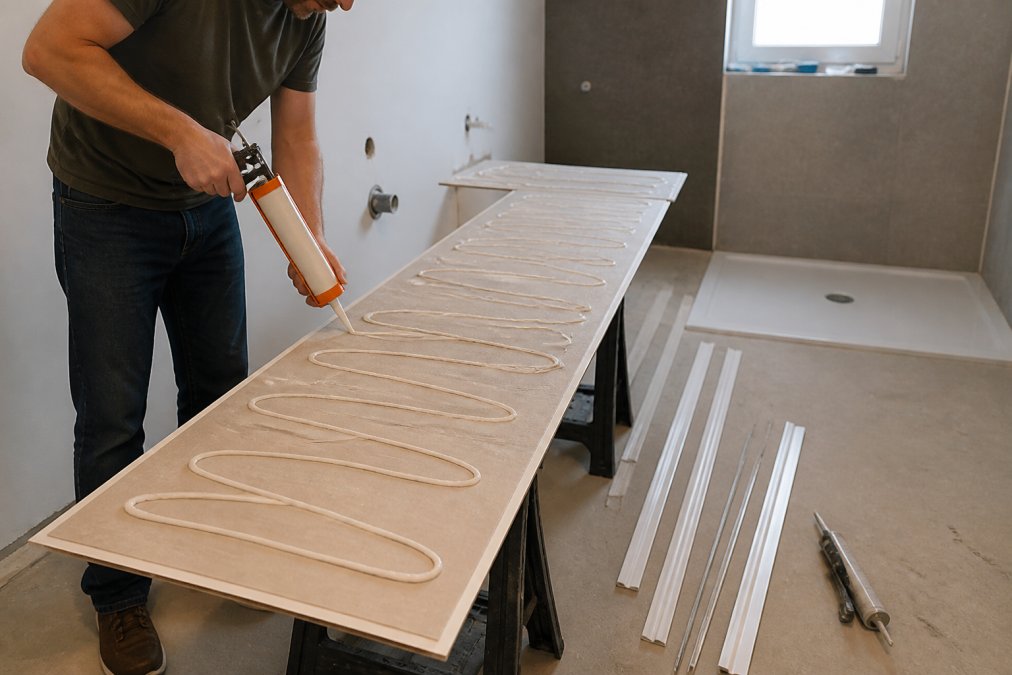
Substrate Preparation: The Step Most DIYers Skip
Substrate preparation is the most important stage. Panels fitted to a poorly prepared surface will bow, delaminate, or allow water ingress behind the panel.
What to do before fitting panels:
- Remove all existing tiles, loose plaster, or failing wall coverings completely
- Check the wall surface for damp, soft spots, or active water ingress - resolve these before proceeding
- Fill any holes or indentations with suitable filler and allow to cure fully
- Sand down high spots so the wall is flat to within 3mm across a 2-metre span
- Clean the surface to remove dust, grease, and residue from old adhesive
- Allow the wall to dry completely - fitting panels over damp substrates traps moisture
Suitable substrates include plasterboard, plywood, existing tiles (if fully bonded and flat), and rendered brick. For wet room installations, a waterproof tile backer board is recommended, as standard plasterboard can deteriorate if moisture penetrates.
Fitting, Adhesive, Silicone Sealant, and Trim Profiles
Step-by-step fitting process:
- Measure and mark - Use a spirit level to mark a true vertical line on the wall as your reference point
- Cut panels to size - Use a fine-toothed saw or jigsaw. Cut face-down to minimise surface scratching
- Apply adhesive - Apply grab adhesive in a serpentine pattern across the back of the panel, keeping 50mm clear of all edges. Press firmly to the wall and check for plumb
- Tongue and groove connection - For narrow panels, engage the tongue of each subsequent panel into the groove of the previous one before pressing to the wall
- Fix trim profiles first - Internal corner trims, external corner trims, and end caps should be fixed before adjacent panels for a clean, professional finish
- Seal all edges with silicone sealant - Apply a continuous bead of bathroom-grade silicone sealant along all horizontal joints, around shower trays, baths, and any penetrations. Tool smooth and allow 24 hours to cure before water exposure
Source the complete installation kit - adhesive, silicone, and trim profiles - from the same supplier as the panels to ensure compatibility.
Bathroom Wall Panel Installation Cost: DIY vs Professional
| Cost Element | DIY | Professional Fit |
|---|---|---|
| Materials (panels, adhesive, silicone, trims) | Full cost | Full cost |
| Labour | None | £150-£400 per day (varies by region) |
| Tools (if not owned) | One-off purchase | Not applicable |
| Time | 1-2 days for average bathroom | 1 day for experienced fitter |
| Risk of mistakes | Moderate | Low |
For a standard shower enclosure using three Maxi Panels at £54.00 each, plus installation accessories, total material cost sits around £200-£250. A competent DIYer can complete this in a day. Panel installation does not require the specialist skills that tiling demands - no grout mixing, no wet saw tile cutting, and no waiting for adhesive beds to cure. The main risk areas are substrate preparation and silicone application, both learnable skills.
According to the Chartered Institute of Plumbing and Heating Engineering, any work involving water supply or drainage connections should be carried out by a competent person. Panel fitting itself does not touch plumbing, so it sits comfortably within DIY scope for most homeowners.
Durability, Maintenance, and Long-Term Troubleshooting
A well-fitted bathroom wall panel installation requires almost no maintenance.
Routine maintenance:
- Wipe down with a damp cloth and mild non-abrasive cleaner
- Avoid solvent-based cleaners, which can damage the panel surface
- Check silicone sealant lines annually, particularly around the shower tray and bath edge
- Re-apply silicone if cracking or shrinkage is visible, before water ingress occurs
Long-term troubleshooting:
Edge lifting is most commonly caused by inadequate adhesive coverage, silicone failure at a joint, or installation over a damp substrate. A panel that lifts within the first year was almost certainly fitted over a surface that was not properly prepared or dried.
Discolouration is rare with UV stable panels but can occur with lower-specification products exposed to direct sunlight. Impact damage from hard knocks is the other common long-term issue; a 10mm panel is more resistant than an 8mm panel.
Environmental Impact and Sustainability Considerations
PVC wall panels carry a complex environmental profile. PVC is petroleum-derived and energy-intensive to produce, but the full picture is nuanced. According to the European PVC industry's sustainability reporting body, VinylPlus, PVC products in construction have long service lives that offset much of their production footprint when measured across the full lifecycle.
The relevant comparison is PVC panels versus ceramic tiles. Ceramic tile production is also energy-intensive, involving kiln firing at high temperatures. Grout requires periodic replacement, adding to material consumption over a bathroom's lifetime. Tiles removed during renovation typically go to landfill, as ceramic is difficult to recycle.
Practical steps to reduce environmental impact:
- Buy the correct quantity to minimise offcuts and waste
- Choose panels with longer warranties and proven durability
- Ask suppliers about take-back or recycling options for offcuts and packaging
- For full wet room installations, consider tile backer boards made from recycled content
The sustainability case for panels is that they are comparable to tiles on environmental impact while delivering significantly better performance in wet areas, which extends the renovation cycle and reduces total material consumed over time.
Choosing the right bathroom wall panels means balancing waterproofing performance, design, ease of installation, and long-term durability. Sourcing materials piecemeal from multiple suppliers often leads to compatibility issues with trims, adhesives, and silicones. Wetwall Wonders offers a complete range of bathroom wall panels - from 250mm tongue and groove panels to 900mm Maxi Panels - alongside all the installation accessories needed to complete the job in a single order. Browse the full range and get started with Wetwall Wonders to transform your bathroom without the complications of traditional tiling.
Frequently Asked Questions
Are bathroom wall panels cheaper than tiling?
In most cases, yes. Bathroom wall panels typically cost less to install than ceramic or porcelain tiles once you factor in labour. Tiling requires a skilled tradesperson for cutting, grouting, and finishing, whereas panels are straightforward enough for a confident DIYer. Material costs are comparable, but removing the need for professional tiling labour makes panels the more budget-friendly option for most UK bathroom renovations.
Can you put bathroom wall panels over existing tiles?
Yes, provided the existing tiles are firmly bonded, flat, and free from damp or mould behind them. Loose, cracked, or hollow tiles must be removed first. Once you confirm the surface is sound, clean it thoroughly and apply a suitable adhesive directly to the tile face. This approach saves significant time on removal and substrate preparation, making it a popular choice for bathroom renovation projects in the UK.
Are PVC bathroom panels waterproof?
PVC wall cladding is 100% waterproof through its core, which makes it well suited to shower enclosures, wet rooms, and splashback areas. The critical point is the joints: all panel edges, corners, and cut edges must be sealed with a sanitary-grade silicone sealant and finished with the correct trim profiles. Without proper sealing at the joins, water can track behind the panels over time regardless of the panel material.
Do I need a professional to install bathroom wall panels?
Most homeowners with basic DIY confidence can install bathroom wall panels without a professional. Tongue and groove systems and adhesive-fix panels are designed for straightforward fitting. You will need standard tools: a tape measure, spirit level, fine-tooth saw, and a silicone gun. Where professional help is worth the cost is in substrate preparation on uneven or damaged walls, or when installing in a wet room where BS 8000 workmanship standards apply.
This article was written using GrandRanker

