
Choosing Adhesive for Waterproof Wall Panels
Table of Contents
- Understanding Adhesive Types for Waterproof Wall Panels
- Best Adhesive for Shower Wall Panels
- Wall Panel Adhesive on Tiles
- Shower Panel Adhesive Curing Time and Setup
- How to Install Waterproof Wall Panels
- Common Installation Mistakes to Avoid
- Ensuring Long-Term Waterproof Performance
- Frequently Asked Questions
Last Updated: October 10, 2026
Understanding Adhesive Types for Waterproof Wall Panels
The waterproof wall panels adhesive you choose determines whether your renovation lasts years or fails within months. The right adhesive bonds panel to wall with flexibility to handle natural expansion, contraction, moisture, and heat.
Four main waterproof wall panels adhesive chemistries exist, each with distinct strengths and trade-offs. Your choice depends on the panel material, wall substrate, moisture exposure, and cure conditions.
Water-based polymer adhesives
Water-based polymer adhesives cure through water evaporation on porous surfaces, requiring good ventilation. Initial set: 1 hour; full cure: 24 hours.
These adhesives work well on insulated boards, timber trim, plasterboard, and standard wall substrates. They're low-odour, low-VOC, and safe to handle indoors without respiratory protection. A water-based option like Decorwall Panel Adhesive Pro bonds securely to most porous surfaces with a ready bond in just 1 hour and full cure in 24 hours. This makes them ideal for homeowners who want a straightforward installation without long wait times.

Water-based adhesives perform poorly on glossy or non-porous surfaces (glazed tile, glass, marble, sealed paint) and require surface preparation. They also cure slowly in cold, poorly ventilated bathrooms.
Best for: Plasterboard, insulated boards, timber, unsealed masonry, and standard painted walls in well-ventilated spaces.
Hybrid polymer adhesives
Hybrid adhesives combine water-based and solvent-free qualities, bonding under wet conditions to nearly any surface, glass, marble, glazed tile, brick, making them ideal for moisture-heavy environments.
Hybrid adhesives like Decorwall Megabond Adhesive handle movement better than water-based options. They're flexible enough to absorb the stress when panels expand or contract with temperature and humidity changes. They also cure faster in humid conditions, often reaching full strength in 12-18 hours in a steamy bathroom, which matters when moisture is constant. Initial set is typically 30-60 minutes.
They're solvent-free or low-solvent, safer for enclosed bathrooms, and maintain adhesion when moisture is present during installation.
Hybrid adhesives cost 30-50% more than water-based alternatives, but their durability, flexibility, and versatility justify the investment for most installations.
Best for: Glossy or non-porous surfaces (tile, glass, marble), showers, high-moisture areas, and installations where curing speed matters.
Polyurethane adhesives
Best for: High-movement installations, cold or damp environments, mixed substrates (e.g., panels over existing tile and plasterboard), and situations where maximum bond strength is essential.
Silicone-based adhesives
Best for: Joint sealing, high-movement areas, thermal-stress environments, and supplementary waterproofing alongside a primary adhesive.
Adhesive compatibility by panel and substrate
The table below maps common panel materials and wall substrates to recommended adhesive types:
| Panel Material | Plasterboard Wall | Glazed Tile | Existing Panels | Masonry | Sealed Paint |
|---|---|---|---|---|---|
| PVC panels | Water-based or hybrid | Hybrid or polyurethane | Hybrid or polyurethane | Hybrid | Hybrid |
| Acrylic panels | Water-based or hybrid | Hybrid or polyurethane | Hybrid or polyurethane | Hybrid | Hybrid |
| Composite panels | Water-based or hybrid | Hybrid or polyurethane | Hybrid or polyurethane | Hybrid | Hybrid |
| Stone or tile panels | Hybrid or polyurethane | Hybrid or polyurethane | Polyurethane | Polyurethane | Polyurethane |
Key decision criteria: Showers demand hybrid, polyurethane, or silicone. Porous surfaces suit water-based; non-porous require hybrid or polyurethane. Cold/damp conditions favour hybrid or polyurethane. Polyurethane and hybrid set faster. Polyurethane and silicone offer superior flexibility.
Best Adhesive for Shower Wall Panels
Shower environments demand strong adhesive that resists water ingress behind panels, where mould and structural damage begin.
For shower wall panels, use a hybrid polymer adhesive. It cures when moisture is present and maintains flexibility as panels shift with temperature changes.
Apply adhesive in continuous vertical beads spaced 100-150mm apart, plus beads along all edges. Continuous beads ensure full coverage and prevent water ingress.
Press panels firmly for at least 30 seconds to force adhesive contact and remove air pockets that allow water penetration.
Wall Panel Adhesive on Tiles
Installing panels over existing tiles requires an adhesive that bonds to glossy, non-porous surfaces.
Remove loose tiles; adhesive cannot bond to failing surfaces. For solid tiles, clean thoroughly with degreaser and dry completely.
For tiled surfaces, use hybrid adhesive, which is engineered for non-porous materials and tolerates moisture behind old tiles.

Apply adhesive in full beads to create a complete seal and prevent water accumulation.
Shower Panel Adhesive Curing Time and Setup
Curing time affects bond strength and when you can use your shower. Understanding initial set versus full cure prevents premature water exposure and failures.
Cure timelines by adhesive type
Water-based adhesives: initial set 1 hour, full cure 24 hours. In cold bathrooms (below 10°C) or poor ventilation, cure extends to 36-48 hours. Avoid water contact until full cure.
Hybrid adhesives cure faster in humid conditions (12-18 hours in steamy bathrooms). Initial set: 30-60 minutes. Check manufacturer guidance for your specific product.
| Adhesive Type | Initial Set | Full Cure | Optimal Temperature | Humidity Sensitivity |
|---|---|---|---|---|
| Water-based polymer | 1 hour | 24 hours | 15-25°C | High (needs ventilation) |
| Hybrid polymer | 30-60 minutes | 12-24 hours | 5-25°C | Low (cures in moisture) |
| Polyurethane | 15-30 minutes | 24 hours | 0-25°C | Low (moisture-activated) |
| Silicone | 30 minutes | 24-48 hours | 5-25°C | Low (moisture-activated) |
Environmental factors affecting cure speed
Temperature is the primary driver of cure speed. Water-based adhesives are temperature-sensitive; below 10°C, cure times double or triple. In cold conditions, use a space heater to maintain 15-20°C during and 48 hours after installation.
Poor ventilation slows water-based adhesive cure. Run extraction fans continuously during installation and 48 hours after. A bathroom fan at 100-150 cubic metres per hour is ideal.
Water-based adhesives cure slower in high humidity. Hybrid and polyurethane adhesives cure faster in humid conditions because they're moisture-activated.
Calculating adhesive coverage and bead spacing
Underestimating adhesive leads to incomplete coverage and water ingress. For a single 1200mm panel, budget one 310ml cartridge. For a full bathroom wall (3-4 panels), budget 4-5 cartridges plus one spare.
Space vertical beads 100-150mm apart (100mm for showers, 150mm for standard walls). Always run full beads along all four edges to prevent water running behind panels.
Create slight squeeze-out (2-3mm) when pressing panels to show adhesive is filling voids. Wipe excess with a damp cloth without breaking bead continuity.
Troubleshooting common curing problems
Panels slipping during cure: Increase bead diameter, reduce panel weight, or use temporary mechanical supports. Hybrid and polyurethane adhesives set faster and resist slipping better.
Poor adhesion after cure: Wall wasn't properly prepared. Remove the panel, clean thoroughly with degreaser, dry completely, and re-apply adhesive.
Adhesive remains tacky after 24 hours: Increase ventilation and raise temperature to 15-20°C. If hybrid adhesives remain tacky, the product may be expired or defective.
Decorwall Panel Adhesive pro (310 ml) →
Mould or discolouration behind panels: Water is penetrating, usually due to failed joint sealing or adhesive bond. Remove panels, dry and treat the wall, and re-install with proper joint sealing.
Verifying waterproofing and warranty compatibility
A waterproof adhesive is not the same as a waterproof panel system. Waterproofing depends on three elements: adhesive, panel material, and joint sealing (silicone).
Check the panel manufacturer's installation instructions before purchasing adhesive. Most warranties require specific adhesive types or brands. Using unlisted adhesives may void the warranty. Always verify compatibility.
Confirm the adhesive is rated "waterproof" or "moisture-resistant" on the product data sheet. Water-based adhesives are "moisture-resistant"; hybrid is "waterproof."
Adhesive alone does not waterproof joints. After adhesive cures, seal all joints and edges with silicone sealant. Most warranties require silicone sealing.
How to Install Waterproof Wall Panels
Installing waterproof wall panels correctly depends on preparation, application, and patience. Follow the process carefully to prevent moisture ingress.
Step 1: Prepare and clean the wall surface
Clean the wall thoroughly. Remove loose material with a scraper, wipe with a damp cloth, and dry completely. Dust and grease prevent adhesive bonding.
Remove peeling or flaking paint. For solid paint, leave it. For glossy paint, lightly sand to improve adhesive grip.
For tiled walls, clean with degreaser and dry fully to ensure adhesive contacts the tile surface.
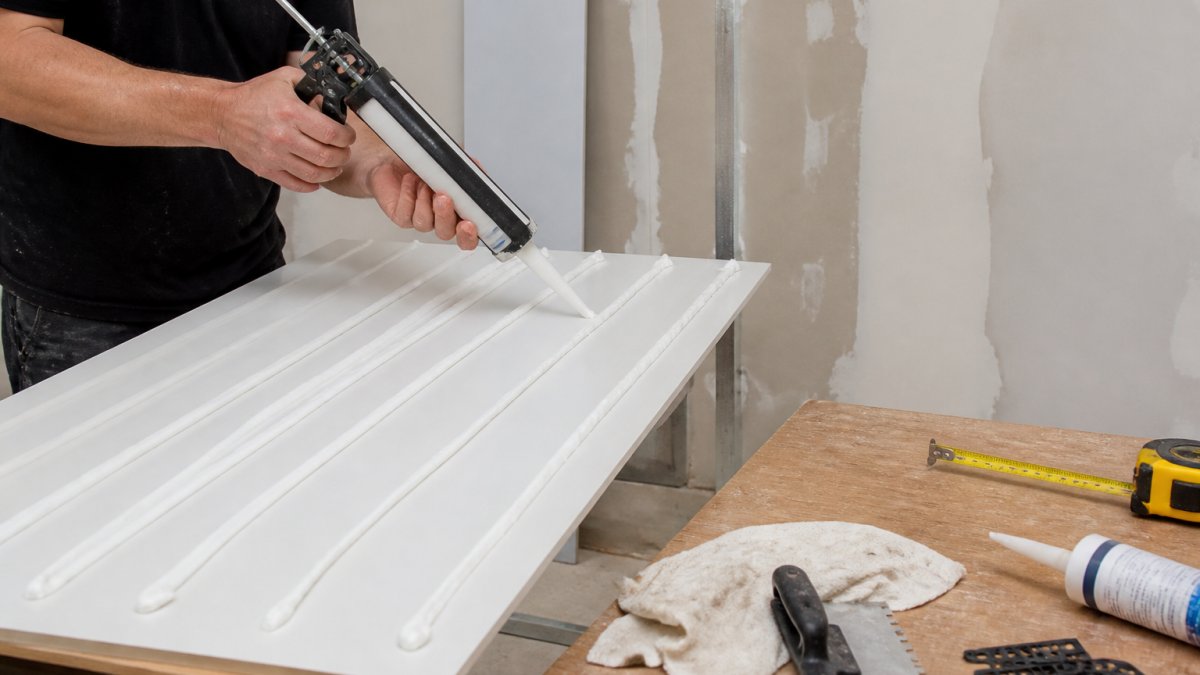
Step 2: Apply adhesive in the correct bead pattern
Load adhesive into a caulking gun. Apply vertical beads 100-150mm apart, plus full beads along all four edges.
Continuous vertical beads ensure full contact. Edge beads prevent water running behind panels at the perimeter.
Create slight squeeze-out when pressing panels to show adhesive is filling voids. Wipe excess with a damp cloth before it dries.
Step 3: Position and press panels firmly
Align the panel carefully before pressing. Use a spirit level to ensure it's straight, especially on the first panel.
Press the panel firmly for at least 30 seconds with even pressure across the surface to force air out and ensure full contact.
Check alignment after pressing. Slight adjustments are possible in the first minute.
Step 4: Seal joints and edges with silicone
After adhesive cures fully, seal all joints and edges with silicone sealant. Silicone remains flexible and prevents water ingress.
Apply silicone along the top, vertical joints, and bottom edges using a continuous bead. Smooth with a wet finger or silicone tool to fill joints completely.
Allow silicone to cure 24-48 hours before water exposure.
Common Installation Mistakes to Avoid
Most panel failures stem from poor preparation or incorrect adhesive application.
Applying adhesive in dots instead of beads is the most common error. Dots leave gaps where water accumulates, causing mould and panel failure. Always use continuous beads.
Skipping surface preparation is another frequent mistake. Dust and grease prevent adhesive from bonding. The panel may seem secure initially, but adhesion fails over time. Spend time cleaning properly.
Installing before adhesive fully cures weakens the bond. Wait the full 24 hours before using a shower, even if the adhesive feels dry.
Neglecting to seal joints with silicone leaves pathways for water. Silicone is the final barrier against water ingress.
Ensuring Long-Term Waterproof Performance
Waterproof wall panels last for decades when installed correctly and maintained properly.
Wait at least one week before hanging heavy items. This gives adhesive time to reach full strength.
Maintain good ventilation. Run the extraction fan during showers and 20-30 minutes after. Open windows when weather permits.
Inspect panels periodically for soft spots, discolouration, or mould. If found, water is penetrating. Reapply silicone to affected areas.
At Wetwall Wonders, we recommend hybrid adhesive like Decorwall Megabond for maximum durability. Pair it with quality silicone sealant and proper technique for long-term performance.
The adhesive you choose and how you apply it determine success. Water-based polymers suit standard walls; hybrid polymers suit showers and tiled surfaces. Prepare surfaces, apply continuous beads, and seal joints with silicone for long-term waterproofing.
Choosing the right adhesive for waterproof wall panels is straightforward once you understand the options.
Frequently Asked Questions
What adhesive should I use for waterproof wall panels?
Use either a water-based polymer adhesive or hybrid polymer adhesive designed for wet areas. Water-based options like Decorwall Panel Adhesive Pro cure in 24 hours and work on most surfaces. Hybrid adhesives, such as Decorwall Megabond, offer flexibility and can bond under moisture, making them ideal for shower environments. Choose based on your substrate type and whether you need flexibility to accommodate movement.
Can I apply wall panel adhesive directly on tiles?
Yes, but preparation is critical. Clean tiles thoroughly with a degreaser to remove soap residue and ensure the surface is completely dry. Glossy tiles require sanding or a primer to improve adhesion. A hybrid polymer adhesive offers better performance on non-porous surfaces than standard water-based options. Test a small area first, and allow full cure time before exposing to moisture.
How long does shower panel adhesive take to cure?
Most panel adhesives develop an initial set within 1 hour, allowing you to position panels safely. Full cure typically takes 24 hours before you can apply water or sealant. Some hybrid adhesives may cure faster under ideal conditions. Check your specific adhesive instructions, as curing times vary by product, temperature, and humidity. Avoid disturbing panels during this period.
Do I need both adhesive and screws to install waterproof wall panels?
Adhesive alone is sufficient for most bathroom wall panels when applied correctly with proper bead spacing. However, mechanical fasteners (screws or trim) may be used alongside adhesive for additional security on larger panels or in high-moisture areas. Always follow the panel manufacturer's recommendations, as some products specify adhesive-only installation to maintain waterproofing integrity.

