
Install Shower Panels Over Tiles: Step-by-Step Guide
Table of Contents
- Can You Install Shower Panels Over Tiles?
- How to Prepare Tiled Walls for Shower Panels
- Tools and Materials Required
- Best Adhesive for Shower Panels Over Tiles
- Step-by-Step Installation Process
- How Long Does It Take to Install Shower Panels?
- Common Mistakes to Avoid
- Benefits of Shower Panels vs Tiles
Last Updated: August 12, 2026
Can You Install Shower Panels Over Tiles?
Yes, you can install shower panels over existing tiles, eliminating costly tile removal and allowing bathroom modernisation without extensive structural work. Success depends on three critical factors: the structural integrity of your existing tiles, thorough cleaning and degreasing, and selecting an adhesive specifically formulated for tile-to-panel bonding. This method offers speed and cost advantages, a weekend project rather than weeks of demolition, but moisture management is critical, as improper installation can trap water behind panels, leading to mould growth and structural damage.
How to Prepare Tiled Walls for Shower Panels
Preparation determines installation success. Rushing this stage is the most common mistake homeowners make and the reason panels peel or bubble after months of use.
Checking for Structural Integrity
Press firmly on several tiles across the wall; they should feel solid and immovable. If tiles flex, crack, or sound hollow when tapped, they're unstable and must be removed. Check grout lines as well, crumbling grout indicates moisture penetration or poor installation. The tile surface should be relatively flat; major undulations will cause panels to sit unevenly and create gaps where moisture can enter.
Look for signs of existing water damage: discolouration, soft spots, or areas where grout has failed completely. These indicate water has already compromised the surface behind the tiles. In these cases, remove affected tiles and allow the substrate to dry completely before proceeding.
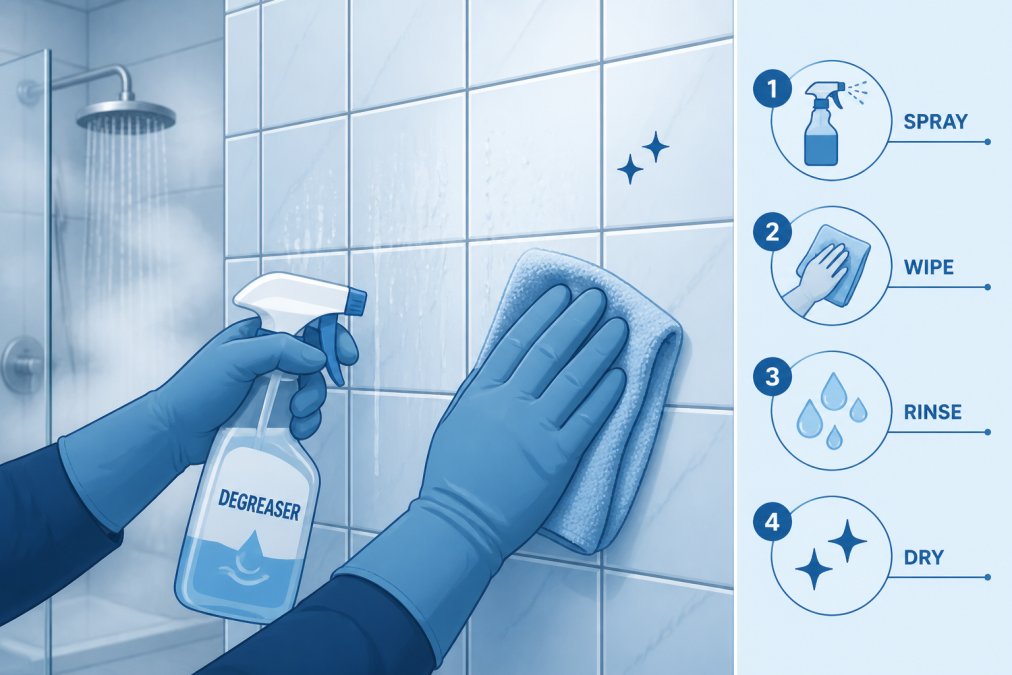
Cleaning and Degreasing Tiles
Tiles accumulate soap residue, limescale, and body oils that create a slippery barrier between tile and adhesive. Apply a degreasing cleaner specifically designed for bathroom surfaces and allow it to sit for 10-15 minutes. Scrub with a stiff brush, paying particular attention to grout lines, then rinse thoroughly with clean water and allow the wall to dry completely, ideally overnight, or at minimum 4-6 hours in a well-ventilated space.
Once dry, inspect the surface in bright light. You should see no streaks, residue, or cloudy patches. Run your hand across the tiles; they should feel slightly rough, not slippery. For stubborn limescale, use a mild acid-based cleaner designed for bathrooms, following product instructions carefully and ensuring adequate ventilation. Rinse multiple times with clean water and allow extra drying time.
Tools and Materials Required
Essential tools:
- Tape measure and pencil for marking
- Spirit level (60 cm minimum)
- Caulking gun for adhesive application
- Jigsaw or hand saw for cutting panels
- Utility knife for trimming sealant
- Grout sponge or soft cloth for cleaning excess adhesive
- Protective gloves and eye protection
Materials:
- Shower panels in standard widths (250mm, 300mm, 500mm, or 900mm)
- Panel adhesive rated for bathroom use; the British Standards Institution guidance on bathroom materials recommends adhesives that provide waterproof bonding
- Silicone sealant for joints and edges (the GP200 General Purpose Silicone Sealant from Wetwall Wonders, available in a pack of 3 for £24.00, is specifically formulated for shower applications)
- Trim profiles if required for finished edges
- Painter's tape to protect surrounding surfaces
The adhesive you choose matters enormously. You need a specialist product formulated for panel-to-tile bonding. Wetwall Wonders stocks two excellent options: the Decorwall Panel Adhesive Pro (310 ml) at £9.00, a water-based adhesive that bonds most materials to tile surfaces, and the Decorwall Megabond Adhesive (295 ml) at £9.00, which uses hybrid polymer technology for superior bond strength on challenging surfaces.

Best Adhesive for Shower Panels Over Tiles
Choose an adhesive specifically formulated for bonding panels to tiles. Water-based panel adhesives work well for most installations and clean up easily. Hybrid polymer adhesives offer superior strength on difficult surfaces, particularly older or glazed tiles. The Decorwall Megabond Adhesive is ideal if your tiles are particularly slippery or if you're working with older ceramic tiles that have a high-gloss finish.

Apply adhesive in a continuous bead around the perimeter of each panel and in a grid pattern across the back surface to ensure complete coverage and prevent air pockets that can trap moisture. Use a caulking gun for precise application. The adhesive should cure fully before exposing panels to moisture, check product instructions for curing time, typically 24-48 hours. Don't use the shower during this period.
Step-by-Step Installation Process
Measuring and Marking Your Layout
Start from the corner or focal point of your shower wall and work outward. Measure the width of the wall and calculate how many panels you'll need. Use a spirit level to mark a vertical line where your first panel will sit; this line is your reference for all subsequent panels. Mark horizontal reference lines at 500mm intervals up the wall to maintain straight alignment.
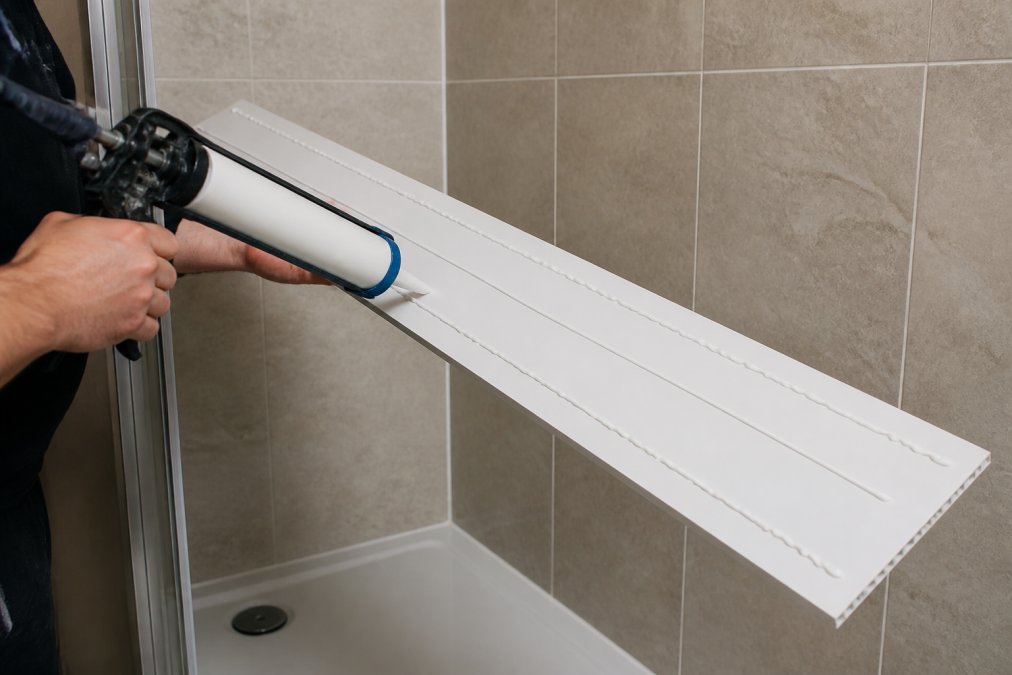
Applying Adhesive and Positioning Panels
Apply adhesive to the back of the first panel in a continuous bead around the perimeter and in a grid pattern (approximately 300mm spacing). A bead roughly 5mm thick is sufficient. Position the panel against the wall, aligning it to your reference lines, and press firmly for 30 seconds. Check that it's vertical using a spirit level and adjust if necessary before the adhesive sets.
Apply the next panel, ensuring a tight joint with the previous one. Most panels have interlocking edges that create a seamless join. Continue across the wall, checking alignment frequently. If you need to cut a panel to fit around a fixture, measure carefully and cut slowly with a jigsaw, then smooth the cut edge with sandpaper.
Sealing Joints and Edges
Once all panels are positioned and the adhesive has cured (typically 24-48 hours), seal all joints and edges with silicone sealant. Adhesive holds panels in place; sealant prevents water penetration. Apply silicone sealant along the top edge where panels meet the wall, along all vertical joints between panels, and along the bottom edge where panels meet the shower tray. Smooth the sealant with a wet finger or caulking tool to create a neat finish. Allow sealant to cure fully (typically 24 hours) before exposing the wall to moisture.

How Long Does It Take to Install Shower Panels?
The entire installation typically takes 6-8 hours for a standard shower enclosure, spread across multiple days when accounting for drying and curing times.
Timeline breakdown:
- Surface preparation and cleaning: 2-3 hours
- Measuring and marking: 30 minutes
- Panel adhesive application and positioning: 2-3 hours
- Adhesive curing: 24-48 hours
- Sealant application: 1-2 hours
- Sealant curing: 24 hours
The majority of time is spent waiting for adhesive and sealant to cure. Plan for a Friday installation so adhesive cures over the weekend and the shower is usable by Monday.
Common Mistakes to Avoid
Skipping surface preparation. Adhesive cannot bond through soap residue and limescale. Spend the time cleaning properly.
Using the wrong adhesive. Standard tile adhesive or general-purpose sealant won't work. Use an adhesive specifically formulated for bonding panels to tiles, such as the Decorwall Panel Adhesive Pro.
Applying adhesive unevenly. Use a continuous bead and grid pattern to ensure complete coverage and prevent air pockets where moisture can accumulate.
Checking alignment inconsistently. Check with a spirit level after every 2-3 panels to prevent misalignment from compounding across the wall.
Exposing panels to moisture before adhesive cures. Adhesive needs 24-48 hours to cure fully. Using the shower too early weakens the bond.
Failing to seal joints and edges properly. Incomplete sealant application is the primary cause of mould growth behind panels.
Cutting panels carelessly. Use a jigsaw and smooth edges with sandpaper to prevent rough cuts that create gaps where moisture can enter.
Ignoring moisture barriers. If existing tiles show water damage or the substrate feels damp, address this before installing panels.
Benefits of Shower Panels vs Tiles
Speed of installation. Panels install in a fraction of the time required for tiling, one day versus several days.
Cost efficiency. Avoiding tile removal saves labour costs. Panels typically cost 30-40% less than retiling when factoring in adhesive, sealant, and labour.
Maintenance-free finish. Panels require no grouting, meaning no grout lines where mould accumulates. Cleaning is as simple as wiping with a damp cloth.
Waterproof design. Modern panels are manufactured with waterproof cores and sealed with silicone, creating a genuinely waterproof surface. Grout in tiled surfaces is porous and can absorb water.
Design flexibility. Panels come in numerous finishes and styles, including tile effects that replicate ceramic or porcelain without the maintenance burden.
Durability. Quality panels are extremely durable and resistant to impact damage. Tiles can crack or chip if struck, requiring replacement.
Moisture management. Panels are designed to manage moisture effectively when installed correctly, particularly important in high-humidity bathrooms.
Installing shower panels over tiles is entirely achievable for a homeowner with basic DIY skills, provided you prepare the surface properly and use the right materials. The process is faster and less expensive than removing tiles and retiling, and the result is a genuinely waterproof, low-maintenance shower enclosure. Wetwall Wonders supplies both the panels and the specialist adhesives you need, the Decorwall Panel Adhesive Pro and Decorwall Megabond Adhesive are specifically formulated for tile-to-panel bonding, ensuring a professional installation that will perform reliably for years. Transform your bathroom with a modern, durable finish from Wetwall Wonders.
Frequently Asked Questions
Can you put shower panels straight onto tiles without removing them?
Yes, you can install shower panels over existing tiles if they are structurally sound, flat, and level. The tiles must be clean, degreased, and free from loose grout. Avoid installation over damaged, cracked, or heavily textured tiles. A quality adhesive like Decorwall Panel Adhesive Pro ensures a strong bond to the tile surface. Proper surface preparation is essential for long-term durability and to prevent moisture issues.
What's the best adhesive for shower panels over tiles?
For shower panels over tiles, use a waterproof, hybrid polymer adhesive such as Decorwall Megabond Adhesive, which bonds securely to most tile surfaces and resists moisture. Alternatively, Decorwall Panel Adhesive Pro offers reliable bonding for bathroom applications. Both adhesives are water-based and designed to handle the moisture-rich environment of a shower. Always apply the adhesive according to the manufacturer's instructions for optimal results.
How long does it take to install shower panels over tiles?
A typical DIY installation over existing tiles takes 4-8 hours for a standard shower wall, depending on the number of panels and your experience level. Professional installers can complete the job in 2-4 hours. Adhesive curing time varies: most products set within 24 hours, though full strength develops over several days. Plan for the adhesive to cure fully before exposing the panels to water spray.
Will water get behind shower panels installed over tiles and cause mold?
Mold risk is minimised when you use waterproof adhesive, apply silicone sealant to all joints and edges, and ensure proper ventilation in your bathroom. GP200 General Purpose Silicone Sealant (Pack of 3) creates a moisture-resistant barrier that prevents water ingress. Ensure tiles are clean and dry before installation. Proper sealing of grout lines and panel edges is critical. Modern shower panels are designed to work with tile substrates when installed correctly, but moisture entrapment can occur if adhesive application or sealing is inadequate.
This article was written using GrandRanker

