
How to Update a Bathroom to Modern Style in 2026
Table of Contents
- Plan Your 2026 Bathroom Update: Costs, Layout and Priorities
- Modern Bathroom Designs for Small Spaces: Layout and Space Optimisation
- Step 1: Set the Palette, Tiles and Materials
- Step 2: How to Install Shower Wall Panels Instead of Tiling
- Step 3: Layer Lighting, Smart Technology and Spa-Inspired Wellness
- Step 4: Add Bathroom Furniture, Fixtures and Fittings
- Step 5: Choose Sustainable Materials and Plan for Maintenance
- Conclusion: Start With the Walls
- Frequently Asked Questions
Last Updated: September 13, 2026
Plan Your 2026 Bathroom Update: Costs, Layout and Priorities
Updating a bathroom to a modern style in 2026 starts with one decision: fix the layout, or refresh the surfaces.
A modern bathroom is defined by clean lines, uncluttered surfaces and a calm, spa-like feel, achieved through materials and lighting rather than sheer spend. At Wetwall Wonders, the biggest visual gains come from walls, lighting and fittings, not moving the soil pipe.
Here's how to plan the update, and where the money goes.
What the Cost of Bathroom Renovation UK Actually Covers
The cost of bathroom renovation UK breaks down into four buckets: labour, sanitaryware, surfaces and fittings. Labour is usually the largest line, as tiling, plumbing and electrical work are time-intensive.
Keeping the existing layout avoids moving waste pipes and rerouting supply lines, where budgets quietly collapse. A refresh that replaces the wall finish, swaps fixtures and layers new lighting costs a fraction of a full reconfigure.
Before committing, check current guidance on planning permission and building regulations for home improvements, particularly if you're altering drainage or adding a wet room. For electrical work in a bathroom, Part P of the Building Regulations applies, and notifiable work must be signed off by a registered electrician (gov.uk).
Modern Bathroom Designs for Small Spaces: Layout and Space Optimisation
Small bathrooms benefit most from a continuous visual plane: fewer seams and a consistent palette make a narrow room read as larger.
Start with space optimisation rather than shopping. Measure the room, mark the shower zone, and decide what can be wall-hung. Wall-hung basin units lift the floor clear, and slim panels in 250mm and 300mm widths finish awkward corners cleanly.
Walk-In Showers, Wet Rooms and the Continuous Floor Plane
A walk-in shower or wet room removes the tray lip and enclosure bulk that eats floor space. The principle is the continuous floor plane: the floor material runs from the room into the shower with no step or break, making the space feel bigger and easier to clean.
Wet rooms demand proper tanking and falls to the drain, so this is not a shortcut project. Walk-in showers with a low-profile tray are the simpler middle ground.
Step 1: Set the Palette, Tiles and Materials
Palette first, products second. Choose colours and finishes before buying anything, or you'll return fittings that clash.
Earthy Tones, Greige and High-Contrast Colour Blocks
Earthy tones and greige remain the safest base for a modern bathroom because they age well and flatter warm and cool lighting. Greige works well with natural textures like wood-effect finishes and matt stone.
For something with more bite, high-contrast colour blocks pair a deep tone with a pale one across a single wall. The trick is restraint: one feature zone, not three.
Geometric Patterns, Art Deco and Vintage Victorian Touches
Geometric patterns add movement without clutter, best on a single wall or floor. Art Deco shows up in stepped profiles, fluted slatwall and brushed brass or chrome detailing. Vintage Victorian touches suit period properties: a high-level cistern look, decorative floor tiling, or a traditional towel rail in a modern finish.
The rule that keeps any of these from looking dated is the same: pick one period reference and keep everything else contemporary.
Step 2: How to Install Shower Wall Panels Instead of Tiling
Learning how to install shower wall panels is faster than tiling and more forgiving for a first-time DIYer. Panels go over a sound, flat substrate: no grout lines, no tile spacers.
The process, in order:
- Check the substrate. Walls must be flat, dry and sound. Remove loose tile or flaking plaster first.
- Dry-fit the panels. Mark cut lines for sockets, pipes and the shower valve before applying anything.
- Apply the adhesive. Use a suitable panel adhesive in vertical beads, following the manufacturer's coverage guidance.
- Seat and level each panel. Press into position and check with a spirit level before the adhesive grabs.
- Seal the joints and edges. Run a quality sanitary silicone where panels meet trays, corners and trims.
- Finish with trims. Internal corner trims and end caps give a clean edge and protect the cut.
Waterproofing, Silicones and Adhesives That Stop Mould
Water behind panels almost always comes down to two things: an uneven substrate and cheap sealant. Mould grows where water sits, so the seal must be continuous and the adhesive must hold the panel flat with no voids.
Use a sanitary-grade, mould-resistant silicone and let it cure fully before the shower goes back into use. Buying adhesive, silicone and trims from the same supplier as the panels removes the guesswork, which is why Wetwall Wonders supplies the full installation kit alongside its wall panels and shower enclosures.
Step 3: Layer Lighting, Smart Technology and Spa-Inspired Wellness
Lighting does more for a bathroom's perceived quality than any other single change, and it's the cheapest upgrade to get right. A modern bathroom needs three layers, each on its own control.
Ambient layer. General illumination: a ceiling fitting, recessed downlights or a central pendant. Aim for warm white around 2700K to 3000K rather than the clinical 4000K+ (bsigroup.com). Fit downlights on a dimmer so the room can drop to a low evening level.
Task layer. The light that lets you shave, apply make-up or brush your teeth without shadows across your face. A mirror light at eye level, or a backlit mirror, beats a ceiling downlight behind your head. Look for a high colour-rendering index so skin tones read accurately.
Accent layer. This makes a bathroom feel designed rather than fitted: a low-level LED strip beneath a wall-hung unit, a niche light inside a shower recess, or a warm glow behind a mirror. It adds depth and a night-time option that doesn't blast the room with light.
Smart Technology That Earns Its Place
Smart bathroom technology splits into features that improve daily use and novelty. These earn their keep:
- Demisting mirrors. A heated pad behind the glass keeps the mirror clear through a shower. This is the single most-used smart feature in a modern bathroom.
- Bluetooth or Wi-Fi audio mirrors. Built-in speakers play music or podcasts without a separate unit. Look for a suitable IP rating.
- Thermostatic showers. A thermostatic valve holds temperature steady when someone else runs a tap, preventing the cold shock common with older mixers.
- Motion-sensing or humidity-sensing extractor fans. These run automatically when moisture rises and continue after the light goes off, far more effective at preventing mould than a fan wired to the light switch.
- Water-saving sensors on taps and showers. These cut flow when not needed, reducing water use without changing how the room feels.
Integrating a Smart Home Ecosystem
If you run a smart home system, the bathroom can join it, but keep the integration proportionate. The practical wins:
- Voice-controlled lighting. A smart bulb or switch in the ambient layer sets scenes by voice or schedule. Useful when your hands are wet or full.
- Humidity-triggered automation. A smart humidity sensor can trigger the extractor fan and a heated towel rail, so the room dries out without you thinking about it.
- Leak and temperature sensors. A small sensor near the cistern, basin or washing machine feed alerts you to a slow leak before it becomes a ceiling stain. The least glamorous smart upgrade and arguably the most valuable.
- Scheduled underfloor heating. A smart thermostat warms the floor only for the hours you use the room.
What to avoid: voice control for everything, screens built into shower enclosures, and app-controlled features you'll never open after the first week. The best smart technology is the kind you stop noticing because it just works.
Creating the Spa-Inspired Wellness Feel
A spa-inspired wellness feel comes from warmth and texture, not gadgets. The elements that deliver it:
- A ladder towel rail in a matt finish, ideally on a timer or smart thermostat so towels are warm when needed.
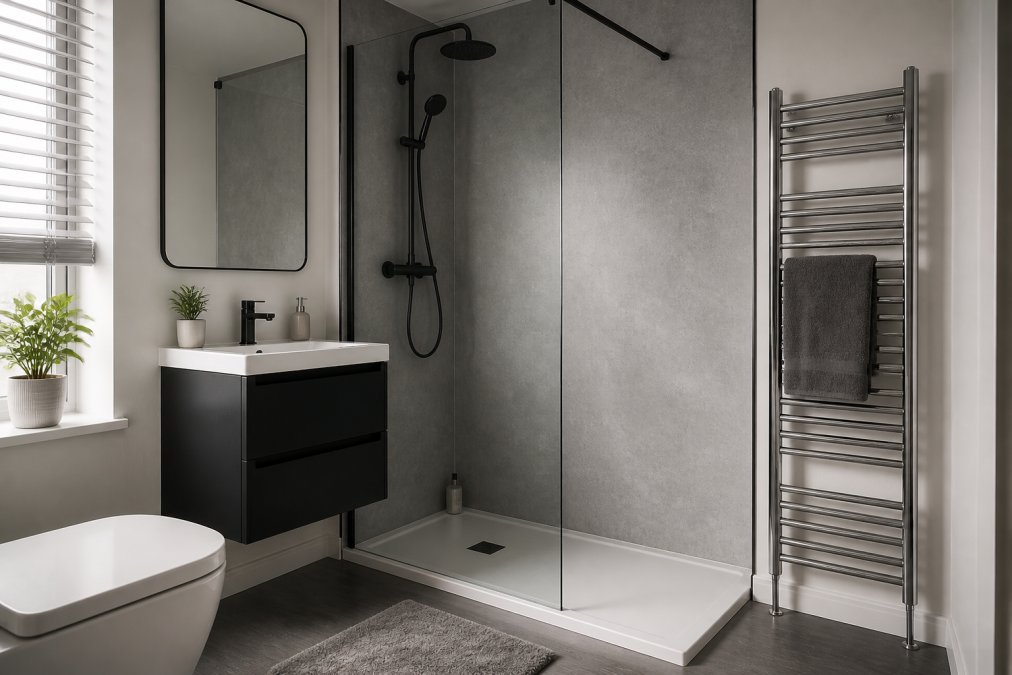
- Warm-toned wall panels or large-format tiles in stone, concrete or wood effects, which read as calm rather than busy.
- Dimmable lighting on a warm white setting, so the room shifts from bright morning to low evening.
- A continuous floor plane from the room into the shower, removing visual clutter and easing cleaning.
- One natural texture, such as a wood-effect panel or stone-effect floor, to break up smooth surfaces.
A screen in the shower or a chromotherapy light won't create a spa feel on its own. Warmth, texture and control over light and temperature will.
Step 4: Add Bathroom Furniture, Fixtures and Fittings
Bathroom furniture is where a refresh starts to look finished. Wall-hung units clear the floor, hide pipework and give a cleaner line. Match finishes across the room: if the tap is matt black, the handles, waste and towel rail should follow.

Two options that pair well with a modern scheme:
- The Cosmos 500mm Basin Unit & Rimless Close Coupled WC Pack - Matt Black at £350.00, a compact wall-hung basin unit with an integrated basin and a rimless close-coupled WC. Best for tight ensuites where floor space is the constraint.
- The Volta 510mm F/S Furniture Pack - Anthracite Gloss w/Black Finishes at £695.00, a floor-standing basin and WC unit package in anthracite gloss with matt black fittings and a concealed cistern. Best for larger bathrooms where you want a matched, furniture-led look.
For lighting and audio in one fitting, the Leven 600 x 600 bluetooth mirror at £407.00 combines built-in LED lighting, Bluetooth audio, a demister and an IP54 rating. And a Wendover Straight Matt Anthracite towel rail at £60.00, tested to BS EN442, ties the finish together.


| Update | Typical Effort | Best For | Priority |
|---|---|---|---|
| Wall panels over tiles | One weekend | DIYers, quick refresh | High |
| Lighting layers | Half a day | Every bathroom | High |
| Furniture and fittings | One to two days | Small spaces, storage | High |
| Walk-in shower or wet room | Weeks, needs a fitter | Space and accessibility | Medium |
| Full layout change | Weeks, multiple trades | Rooms that don't work | Low |
Step 5: Choose Sustainable Materials and Plan for Maintenance
Sustainable materials in a bathroom mean durable ones. A finish that lasts fifteen years beats a cheaper one that fails in three, whatever it's made from. This decides whether your modern bathroom still looks modern in 2036.
What Makes a Bathroom Material Sustainable
Look at four things: lifespan, material use, water use and end-of-life.
- Lifespan. A wall panel system or large-format tile that stays put for fifteen years avoids the repeated manufacturing, transport and waste of a finish redone every five. Durability is the most underrated sustainability metric in a bathroom.
- Material use. Panel systems use less material than a tiled wall: no tile adhesive, grout or backer board in most installations. Fewer components means less embodied carbon and less waste offcut.
- Water use. A thermostatic shower with a water-saving head, a dual-flush or rimless WC, and sensor taps cut water use without changing how the room feels. These have the clearest environmental payback.
- End-of-life. Look for recyclable panel cores and low-VOC adhesives where specified. Avoid composites that cannot be separated or recycled.
Ventilation is part of the picture too. A bathroom that dries out properly needs less heating, repainting and fewer replacements. A humidity-sensing extractor fan running for the right time does more for longevity than any surface finish.
A Maintenance Schedule That Keeps the Room Modern
Maintenance is the part most guides skip. A realistic schedule:
Weekly. Wipe panel walls and tiles with a non-abrasive cleaner. Avoid cream cleaners and scourers, which dull the surface and leave a haze that makes a modern finish look tired.
Monthly. Check silicone at the tray, corner joints and basin edge for discolouration or lifting. Clean the extractor fan grille, because a clogged fan stops removing moisture and mould follows.
Every six months. Re-seal discoloured or lifting silicone. Check the seal around the shower screen and WC base. Descale the shower head and exposed chrome, because limescale etches finishes.
Annually. Check sealant around the bath or tray for movement, and inspect wall-hung unit fixings for tightness. If you have underfloor heating, check the thermostat responds.
Universal Design: Modernising for Every Age and Ability
This is the angle most modern-bathroom guides miss, and it matters most over the life of the room. Universal design means designing for every age and ability from the start, rather than retrofitting grab rails later. Most universal-design choices are also modern-design choices.
- A low-threshold or level-access shower. A walk-in shower with a low-profile tray or a fully tanked wet room removes the step that becomes a barrier with age or injury. It also looks cleaner and is easier to clean.
- A wall-hung basin unit. Lifts the floor clear, making the room easier to navigate with a walking frame or wheelchair, and hides pipework for a cleaner line.
- A lever or mixer tap. Easier to operate than cross-head or twist taps for anyone with reduced grip strength, and more contemporary.
- Reinforced wall zones. If stripping the walls back, adding noggins or a ply pattress behind the wall finish in the shower and beside the WC costs little at that stage and means a grab rail can be fitted later without opening up the wall.
- Good, even lighting. Bright, shadow-free task lighting at the mirror and a night-time low-level option reduce slips and make the room easier to use at any age.
- A comfort-height WC. A slightly taller pan is easier to sit down on and stand up from, and is now common in modern ranges.
These choices cost little extra at the planning stage and make the room workable for every age and ability. A modern bathroom that cannot adapt is not really modern.
Conclusion: Start With the Walls
The hardest part of a bathroom update isn't the budget or the trades, it's deciding where to start. Start with the walls. They cover the largest visible area, set the palette for everything else, and need no plumbing or electrics.
Wetwall Wonders stocks wall panels in 250mm, 300mm, 500mm and 900mm widths, including Dumawall tile-effect panels and Linerio slatwall, plus the adhesives, silicones and trims to finish the job in one order. Get the walls right first and the rest falls into place.
Frequently Asked Questions
What are the bathroom style trends for 2026?
The strongest 2026 direction is calm, spa-inspired bathrooms built around earthy tones, greige and pastel shades rather than stark white. Expect walk-in showers and wet rooms with a continuous floor plane, geometric and Art Deco tile patterns, natural textures, ambient lighting and smart technology. Uncluttered layouts with fewer, better fixtures and fittings dominate over busy decorative schemes, and sustainable materials are now a mainstream choice rather than a niche one.
How can I modernise a small bathroom on a budget?
Start with the surfaces, because they cover the most visible area for the least money. Replacing tired tiles with wall panels avoids the cost of stripping and re-tiling, and you can keep the existing suite if it is sound. Swap in a matt black or brushed brass towel rail, add an LED mirror and change the lighting to warm ambient. Work in this order: walls, lighting, then fixtures, so each step lifts the whole room without a full strip-out.
Are wall panels a good alternative to tiles for a modern bathroom?
Yes, for most modern schemes. Panels give you a grout-free surface, so there is far less to scrub and no grout lines to discolour. They go straight over a sound, flat wall, which cuts installation time compared with tiling, and the waterproofing comes from the panel plus the correct silicone and adhesive behind it. Choose large-format panels for a seamless look, or narrow 250mm and 300mm widths where a small ensuite has awkward corners.
How do I choose the right lighting for a modern bathroom?
Layer it. Use a bright, cool light over the mirror for shaving and makeup, warm ambient lighting elsewhere, and a dimmable circuit so the room can shift from functional to relaxing. A backlit or Bluetooth mirror with a built-in demister keeps the mirror clear and adds light without a separate fitting. Keep everything rated for bathroom zones, and put the ambient light on a separate switch so you are not forced to run full brightness every time.
A modern bathroom is a sequence of decisions, and getting the order wrong is what turns a refresh into a rebuild. Work from the walls outward, keep the layout unless it genuinely fails, and buy your panels and installation materials together so nothing stalls mid-project. Browse the Wetwall Wonders range of wall panels, shower enclosures and bathroom furniture, and start with the surface that changes the room most.

