
How to Choose the Right Bathroom Wall Panel Finish
Table of Contents
- Why Bathroom Wall Panel Finish Matters More Than You Think
- Matt vs Gloss Bathroom Wall Panels: Which Finish Suits Your Space?
- The Benefits of PVC Bathroom Panels for Wet Areas
- How to Clean Bathroom Wall Panels Without Damaging the Finish
- Matching Finish to Your Bathroom Style and Substrate
- Repair, Sustainability, and Acoustic Considerations
- Conclusion
- Frequently Asked Questions
Last Updated: September 28, 2026
Why Bathroom Wall Panel Finish Matters More Than You Think
Water sits on your bathroom walls every day: steam condenses, splashes land, and grout lines absorb it all. That is why the finish you choose for your bathroom wall panel matters more than most renovators expect, it determines how the surface handles moisture, how often you clean it, and how the room feels every morning. This guide from Wetwall Wonders covers matt versus gloss, substrate compatibility and repairability.
Matt vs Gloss Bathroom Wall Panels: Which Finish Suits Your Space?
Matt finishes diffuse light and hide water marks; gloss finishes reflect light and make small rooms feel larger. Neither is better in the abstract.
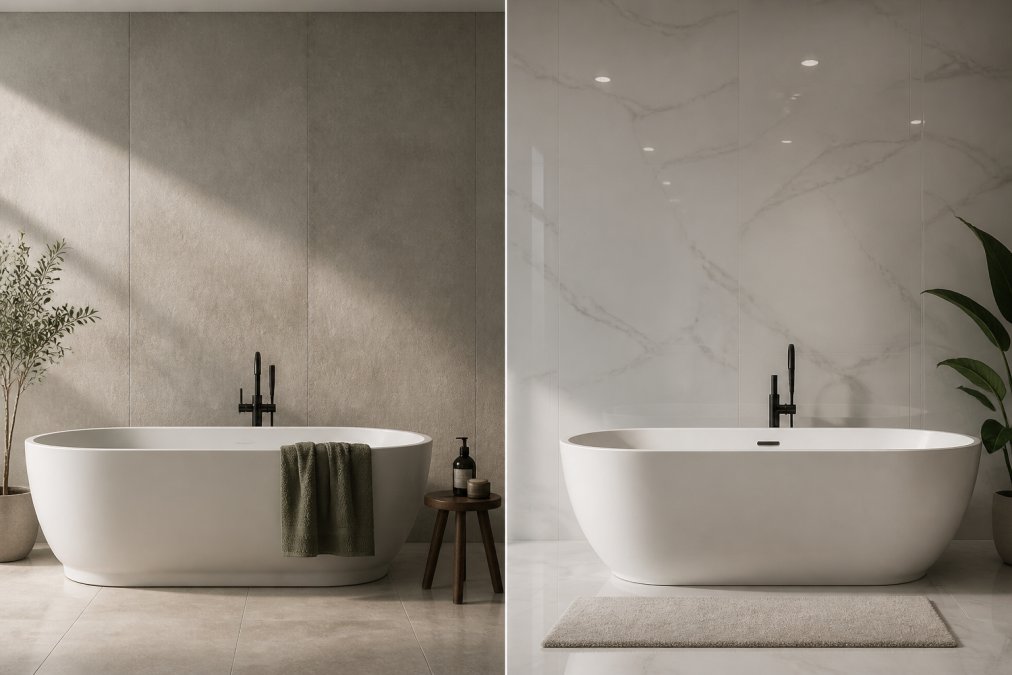
Light Reflection and Room Size
Gloss panels bounce light around a room, which helps a narrow ensuite or windowless wet room. The catch: gloss also reflects imperfections, so every dried droplet and smear shows up.
Cleaning and Maintenance Differences
- Gloss: Shows water spots and streaks quickly, but wipes clean in seconds with a soft cloth
- Matt: Hides marks between cleans, but textured matt surfaces can trap soap residue if you scrub carelessly
- Both: A non-porous surface means nothing soaks in, so neither finish stains the way grout does
For the lowest-effort routine, match the finish to your habits: people who wipe down after every shower do fine with gloss, while once-a-week cleaners should lean matt.
| Finish | Light Behaviour | Hides Water Marks | Cleaning Effort | Best For |
|---|---|---|---|---|
| Gloss | High reflection | Poorly | Low per clean | Small, dark rooms |
| Matt | Diffused, soft | Well | Moderate | Larger rooms, busy households |
| Textured matt | Absorbed | Very well | Moderate | Feature walls, wet rooms |
| Satin | Balanced | Reasonably | Low | All-round compromise |
The Benefits of PVC Bathroom Panels for Wet Areas
PVC panels are the practical default for wet areas because the material is non-porous and unaffected by standing water. A PVC bathroom wall panel does not swell, rot, or feed mildew the way porous substrates can, removing most maintenance headaches associated with tiled walls.
Waterproof and Mildew-Resistant Properties
The waterproofing comes from the panel core, not a coating. With no grout line for water to sit in, there is no grout line to discolour. Panels such as the Decorwall Maxi Panels in Beige Marble are described as 100% waterproof with a tongue-and-groove edge, keeping joints tight and reducing seams moisture can reach.

Durability and Longevity
Durability comes down to three things: impact resistance, UV stability near windows, and how well the surface survives cleaning. A thicker panel resists dents better, and a UV-resistant surface will not yellow in a sunlit bathroom. The Decorwall Elite Print in Sandstone is a hygienic PVC panel rated for bathrooms, wet rooms and kitchens, so it is built for consistent moisture rather than occasional splashes.

How to Clean Bathroom Wall Panels Without Damaging the Finish
The safest routine for any panel finish is warm water, a soft cloth, and a mild detergent, applied gently and rinsed. Abrasive creams, scouring pads, and solvent-heavy sprays dull a finish long before the panel itself wears out.
Matching the Cleaner to the Finish
- Gloss and satin: pH-neutral bathroom cleaner, or warm water with a drop of washing-up liquid. Avoid cream cleaners, descalers left to dwell, and anything labelled "scratch-free" that still contains calcium carbonate.
- Matt and textured matt: the same neutral cleaner, but rinse more thoroughly. Residue trapped in the texture is the main cause of a patchy matt finish.
- Slatwall and grooved profiles: a soft brush along the groove direction, then a microfibre wipe. Do not flood the grooves, because water can sit in the channel.
- Around silicone lines: a bathroom-specific silicone cleaner. Never leave bleach to sit on a silicone bead, it breaks down the sealant long before it kills the mould.
Follow this order:
- Rinse the wall with warm water to lift loose soap film
- Wipe with a soft microfibre cloth and a mild detergent
- Rinse again so no residue dries on the surface
- Dry with a separate cloth to prevent water spotting on gloss finishes
- Treat any mould-prone silicone line with a bathroom-specific cleaner, never bleach left to sit
For textured finishes, work along the grain rather than in circles, which push residue into the low points of the pattern.
Removing Scratches and Scuffs: Gloss vs Matt
- Gloss panels: light surface scuffs can sometimes be worked out with a plastic polish or a fine finishing compound applied by hand, because you are refining the same polished layer that produced the shine. Work in small circles, test on an offcut first, and stop the moment the scratch stops catching the light. Deep scratches that have cut through to the core cannot be polished out, the colour and pattern sit below the surface.
- Matt panels: polishing is the wrong approach. Buffing a matt surface creates a shiny patch that is more obvious than the original scratch. The realistic options are a colour-matched touch-up where the scratch is shallow, or replacing the individual panel.
- Textured and slatwall panels: scuffs often sit in the raised areas. A soft brush and neutral cleaner removes most marks; anything deeper usually means swapping the panel.
What Actually Causes Long-Term Finish Damage
Most finish failures trace back to four causes, none of them the panel's fault:
- Abrasive cleaning, the single most common cause of a dulled gloss finish.
- Limescale left to dwell, hard water deposits etch the surface if left for weeks, particularly in hard-water areas.
- Solvent contact, nail varnish remover, acetone, and some aerosol air fresheners attack the top layer.
- Heat close to the surface, a hairdryer held against a panel, or a heater placed too near, can distort the top layer.
Matching Finish to Your Bathroom Style and Substrate
Style and substrate should be decided together, because the panel you love is useless if the wall behind it cannot take it. Substrate means whatever the panel is fixed to: plasterboard, existing tiles, or a solid wall. Each behaves differently.
Decorwall Maxi Panels-Beige Marble →
- Painted plasterboard: Requires a sound, dry, flat surface and the correct adhesive
- Existing tiles: Can often be panelled over if the tiles are firmly bonded and level
- Uneven walls: May need battening first so panels sit flat and joints stay tight
Plan your panel layout before you buy. Mark where seams will fall on the wall, then choose widths that push those seams to corners and away from eye level. It is the single biggest visual upgrade for very little extra cost.
Repair, Sustainability, and Acoustic Considerations
Repairability is where panels quietly beat tiles. A scuffed panel can often be repaired or replaced individually, whereas a cracked tile usually means chiselling out and re-grouting a section, matching a discontinued tile, and hoping the shade matches. Keeping one spare panel means a future repair is a ten-minute job rather than a re-tile.
Compatibility With Existing Wall Substrates
This is where installations actually fail. The panel is rarely the problem, the surface behind it is. Before you buy, identify what you are fixing to.
- Painted plasterboard: must be sound, dry, and flat. Flaking paint must be removed, and glossy paint should be keyed so adhesive can grip. If the plasterboard has ever been damp, fix the cause before panelling over it, you will be sealing the problem in.
- Existing tiles: can often be panelled over, but only if the tiles are firmly bonded, level, and free of loose grout. A tile that sounds hollow when tapped needs removing first. Glazed tiles are non-porous, so use an adhesive specified for non-porous substrates rather than a standard grab adhesive.
- Bare plaster: must be fully dry, and any dusty or friable surface needs sealing first so the adhesive bonds to the wall rather than to the dust.
- Uneven or bowed walls: battening creates a flat plane for the panels to sit on. This costs more in time and materials but is the only reliable way to keep joints tight on a wall that is out by more than a few millimetres.
- Solid masonry and brick: usually sound, but cold. An insulated backing board or battens with insulation behind can reduce condensation on the panel face in a cold room.
Never panel over a damp or mould-affected wall without treating the cause first. Sealing moisture behind a panel traps it against the substrate and can lead to mould growth in the void, which is far harder to deal with than the original problem.
Sustainability: What Actually Matters
On sustainability, the practical points are lifespan and waste. Panels that last longer and can be replaced individually generate less waste than a full strip-out, and PVC-based panels are widely recyclable at end of life. Ask your supplier about take-back or recycling routes.
Acoustic Properties
Acoustics rarely get mentioned, but they matter in a busy household. Hard, glossy surfaces reflect sound, so a fully gloss-tiled bathroom echoes. Matt and textured panels absorb a little more, and adding a panel to a hollow wall can slightly deaden the drum-like resonance of bare plasterboard. It will not soundproof a room, but it takes the edge off.
Choose panels you can repair individually, keep one spare, and you have solved the two biggest long-term frustrations of bathroom walls.
Conclusion
The hardest part of a bathroom renovation is not picking a colour. It is committing to a finish that still works when the room is steamy, busy, and cleaned in a hurry. Get the finish right and everything else gets easier.
Frequently Asked Questions
What finish is best for bathroom walls?
The best bathroom wall panel finish depends on the look you want and how much maintenance you will accept. Matt finishes hide water spots and smudges well, making them ideal for busy family bathrooms. Gloss finishes reflect light and can make a small bathroom feel larger, but they show water marks more easily. For wet rooms and shower enclosures, a matt or textured finish often works better because it provides grip and disguises everyday wear.
Are gloss or matt bathroom panels easier to clean?
Gloss panels have a smooth, non-porous surface that wipes clean with a damp cloth, so everyday grime comes off quickly. Matt panels have a subtle texture that can trap soap residue if not rinsed properly. However, matt finishes hide water spots and light scratches better between cleans. For either finish, use a mild non-abrasive cleaner and avoid scrubbing pads that can dull the surface. A quick wipe after showering keeps both finishes looking new.
Do bathroom wall panels require special maintenance?
Bathroom wall panels need very little maintenance compared to tiles. There is no grout to scrub, so a weekly wipe with a soft cloth and mild soap is usually enough. Check the silicone seals around edges and shower enclosures every few months and reapply if they crack or lift. Avoid abrasive cleaners and bleach-based products on coloured or printed panels, as they can fade the finish over time. Proper installation with quality adhesives and silicones prevents water ingress behind the panels.
How do I choose between PVC and acrylic panels for a wet room?
PVC panels are lightweight, 100% waterproof, and cost-effective, making them a strong choice for DIY bathroom renovations. They are easy to cut and fit with tongue-and-groove edges. Acrylic panels offer a glossier, more premium look and cost more. For wet rooms and shower enclosures, both work well when installed with waterproof adhesives and sealed correctly. Consider your budget and whether you want a matt or gloss finish before deciding.

