
Can Narrow Bathroom Panels Prevent Leaks?
Table of Contents
- Can Narrow Bathroom Panels Actually Prevent Leaks?
- How to Seal Shower Wall Panels Correctly
- Bathroom Wall Panel Installation Mistakes That Cause Leaks
- Best Sealant for Bathroom Wall Panels
- Why Panel Width Matters for Leak Prevention
- Surface Preparation and Substrate Compatibility
- Long-Term Maintenance to Prevent Water Ingress
- Conclusion
Last Updated: August 29, 2026
Can Narrow Bathroom Panels Actually Prevent Leaks?
Narrow bathroom panels can prevent leaks when installed correctly with proper sealing, but panel width alone doesn't guarantee a water-tight bathroom. The real protection comes from how you seal the joints, prepare the substrate, and maintain the sealant over time. A 250mm panel installed with care outperforms a 900mm panel installed poorly. The difference lies in silicone sealant application, substrate compatibility, and long-term maintenance rather than the panel width itself.

This guide covers exactly how to prevent leaks with narrow panels, common mistakes that cause failure, and the maintenance habits that keep your bathroom dry for years.
How to Seal Shower Wall Panels Correctly
Sealing is where most narrow panel installations fail or succeed. A properly sealed panel creates a moisture barrier that stops water ingress before it reaches the substrate.
The Role of Silicone Sealant in Water Protection
Silicone sealant is not optional, it's the foundation of leak prevention. Unlike grout or adhesive alone, silicone remains permanently flexible, absorbing the minor movement that occurs as panels expand and contract with temperature changes. When rigid sealants crack, water finds its way through.
The sealant must have fungicide to resist mould growth in the damp environment behind panels. Look for products specifically formulated for bathrooms. The GP200 General Purpose Silicone Sealant [from Wetwall Wonders(/products/gp200-general-purpose-silicone-sealant) | wetwallwonders.com] contains fungicide and is UKCA approved, making it suitable for both interior and exterior bathroom applications.
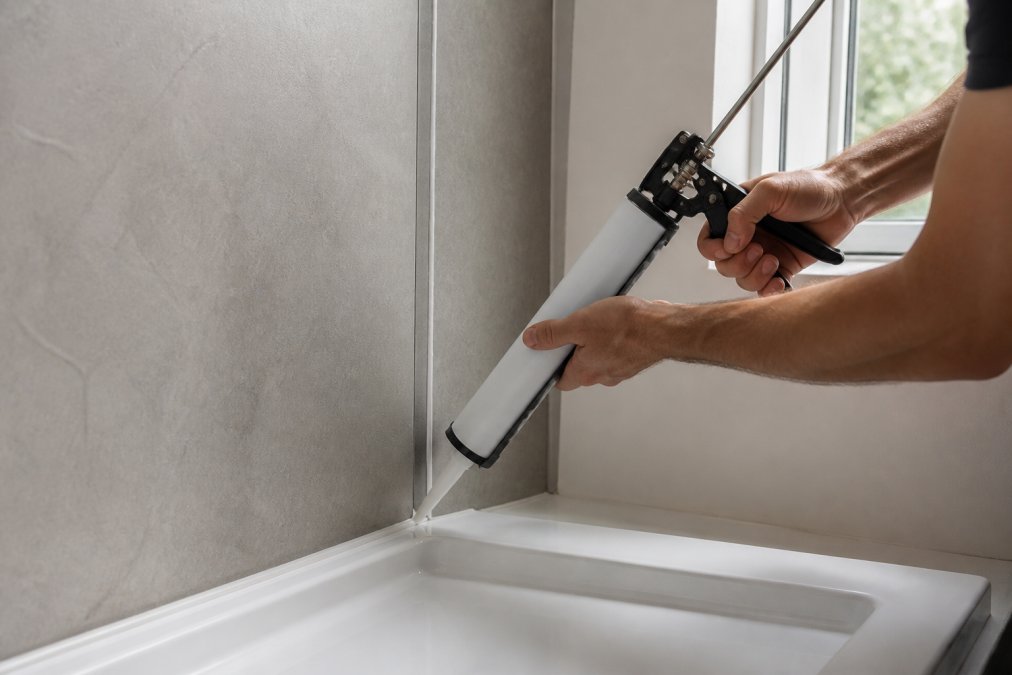
Apply silicone to every joint where two panels meet, every internal corner, and along the bottom edge where the panel meets the substrate. A continuous bead prevents water from finding gaps. The sealant should be applied generously, a thin bead fails faster than a strong one.
Sealing Joints and Edges Step by Step
Proper sealing requires attention to detail:
-
Prepare the joint surface. Wipe away dust, debris, and old sealant with a damp cloth. Allow to dry completely.
-
Cut the sealant nozzle at a 45-degree angle. The cut should match the joint width, typically 5-8mm for panel seams.
-
Apply a continuous bead. Hold the caulking gun at 45 degrees and move steadily along the joint. A continuous bead is stronger than multiple segments.
-
Smooth the bead immediately. Use a wet finger or caulking tool to press the sealant into the joint and remove air pockets.
-
Allow full cure time. Most silicones require 24-48 hours to cure fully (peer-reviewed research on sealant curing times). Don't expose the joint to water during this period.
-
Inspect for voids. After curing, run your finger along the bead. Any gaps or thin spots should be filled with a second application.
The internal corner trim, such as the 10mm internal corner trim from Wetwall Wonders, should also be sealed along its edges to prevent water from running behind the trim.
Bathroom Wall Panel Installation Mistakes That Cause Leaks
Most leaks develop because of preventable installation errors.
Insufficient substrate preparation is the most common failure point. If the wall isn't clean, dry, and even, the adhesive doesn't bond properly. Always remove old tiles, wallpaper, and loose paint. Fill holes and sand uneven areas. A smooth, clean substrate is non-negotiable.
Skipping adhesive on panel edges is another frequent mistake. Apply adhesive to the full width of the panel back, not just the centre. Unsupported edges flex, allowing water to find its way behind the panels.
Mismatched sealant and substrate causes long-term failure. If your substrate is damp or porous, the sealant won't adhere properly. Use a primer on porous substrates before applying sealant. If the substrate is genuinely damp, address the source of moisture before installing panels.
Rushing the installation costs time later. Skipping substrate preparation or applying sealant before adhesive has cured creates weak points that water exploits within months.
Using the wrong panel material is equally damaging. Ensure your panels are rated 100% waterproof and suitable for wet room use. PVC panels are more reliable than cheaper alternatives.
Best Sealant for Bathroom Wall Panels
The sealant you choose directly affects how long your installation stays watertight. A good sealant must be flexible, fungicide-rich, and fast-setting.
The GP200 General Purpose Silicone Sealant is specifically designed for bathroom applications. It's acetoxy cure, setting quickly within 24 hours, allowing you to use the shower sooner. The fungicide prevents mould growth, which is critical in wet environments. It's permanently flexible, so it won't crack as panels expand and contract.
Apply sealant to every joint, including where panels meet the substrate at the bottom edge and where they meet trim profiles at the top. Don't assume internal corners are sealed by the corner trim alone.

Why Panel Width Matters for Leak Prevention
Narrow panels create more seams per square metre than wide panels, with real implications for water management and sealant durability.
The Structural Challenge of Narrow Panels
When water hits a shower wall, it concentrates along seams. A 250mm panel has four times as many vertical seams per square metre as a 1000mm panel. Each seam is a potential weak point if the sealant fails.
Narrow panels also experience greater edge deflection under water pressure. This flexing stresses the sealant bead at the joint. Over months, repeated micro-movement causes the sealant to crack or pull away from the panel edge.
The adhesive bond also matters more with narrow panels. Because the panel is narrower, the total adhesive surface area is smaller. Incomplete adhesive coverage leaves unsupported edges with more freedom to move. Wide panels tolerate minor adhesive gaps; narrow panels do not.
Sealant Stress Concentration at Narrow Panel Joints
Silicone sealant is flexible, but it has limits. A sealant bead at a narrow panel joint experiences higher stress concentration than one at a wide panel joint. Water also behaves differently at narrow seams, capillary action is more pronounced in narrow gaps, allowing water to wick behind the panel more easily if the sealant bead is thin or has a void.
Narrow panels require:
- Thicker sealant beads. Aim for 8-10mm to account for higher stress concentration.
- More frequent inspection. Check narrow panel seams every 6 months rather than annually.
- Faster re-sealing cycles. Sealant typically needs replacement every 4-5 years, versus 5-7 years for wide panels.
- Better substrate support. Ensure the wall is absolutely flat and well-bonded.
When Narrow Panels Are the Right Choice
Narrow panels are often the better choice for specific applications. Small ensuite bathrooms, shower niches, and spaces with irregular dimensions are difficult to tile or panel with wide formats. A 250mm panel like the Decorwall Elite Print in Arctic Grey minimises waste and reduces the number of cuts, which paradoxically reduces leak risk because fewer cut edges mean fewer potential failure points.
The key is acknowledging that narrow panels require more meticulous sealing and more frequent maintenance. If you're willing to invest that effort, they perform as well as any alternative.
Surface Preparation and Substrate Compatibility
The substrate determines how well the adhesive and sealant bond. A poor substrate undermines even the best installation technique.
Plaster walls are porous and can be damp, both preventing proper adhesion. Prime plaster with a moisture-resistant primer before installing panels.
Damp walls are a red flag. Address the source of moisture before installing panels. Panels trap moisture behind them, accelerating mould growth.
Uneven surfaces create gaps between the panel and the wall. Water finds these gaps and runs behind the panels. Sand down high spots and fill low spots. The substrate should be flat to within 3mm over a 2-metre span, in line with common building standards for wall finishes.
Tile substrates can work if they're clean and well-bonded. Remove any loose tiles and re-grout before installing panels. Some installers prefer to remove tiles entirely and install panels on a clean wall.
Check the adhesive specifications before purchasing. Using the wrong adhesive for your substrate is a common but easily avoidable mistake.
Long-Term Maintenance to Prevent Water Ingress
Installation is the first step. Long-term leak prevention depends on understanding how sealant degrades, recognising failure signs early, and re-sealing before water penetrates behind the panels.
The Sealant Degradation Timeline
Silicone sealant degrades in stages:
Months 0-6 (Curing and initial set). The sealant reaches 80% of its final strength within 7 days but takes 28 days to fully cure. Avoid exposing the sealant to water during this period. Many leaks occur because homeowners use the shower before the sealant has fully set.
Months 6-18 (Peak performance). The sealant is fully cured and performing optimally. Leaks during this phase indicate installation errors, not sealant failure.
Months 18-36 (Early degradation). The sealant begins to lose flexibility. You may notice the bead becoming less glossy or slightly discoloured. This signals that degradation has begun.
Months 36-60 (Visible wear). Hairline cracks may appear, particularly at the edges where the sealant meets the panel. Mould may also begin to colonise the sealant surface. Re-sealing is advisable at this stage.
Months 60+ (Critical failure risk). The sealant loses significant flexibility and may pull away from the panel edge, creating gaps. Leaks are likely within 6-12 months if the sealant hasn't been replaced.
This timeline assumes normal bathroom use. High-use bathrooms may see degradation 12-18 months earlier. Low-use bathrooms may extend the timeline by 12 months.
Early Warning Signs of Sealant Failure
Regular inspection catches problems before they become expensive:
Hairline cracks in the sealant bead are the earliest visible sign of degradation. Use a torch to inspect closely.
Sealant pulling away from the panel edge creates a thin gap (1-2mm) where water can wick behind the panel.
Discolouration or yellowing indicates UV exposure or chemical degradation, accelerating loss of flexibility.
Mould growth on the sealant surface signals a moist environment and reduced fungicide effectiveness.
Soft or spongy sealant indicates significant degradation and should be replaced immediately.
Water staining or damp patches on the wall below the panels indicates water has already penetrated. Address this urgently.
Re-Sealing Schedule and Process
Plan for re-sealing every 4-5 years for narrow panels and every 5-7 years for wide panels. Don't wait for visible failure.
Year 1-2: Inspect sealant every 6 months. Clean sealant with a damp cloth monthly to remove soap residue and monitor for mould.
Year 3: Conduct a thorough inspection. If you spot hairline cracks, discolouration, or mould, re-seal those sections immediately.
Year 4-5: Plan a full re-sealing project. Remove old sealant carefully with a utility knife. Clean the joint thoroughly with a damp cloth and allow to dry completely. Apply fresh silicone sealant following the same process as the original installation.
The GP200 General Purpose Silicone Sealant is suitable for re-sealing work and comes in packs of three.
Environmental Factors That Accelerate Degradation
Poor ventilation is the primary accelerant. Run an extractor fan during and for 20 minutes after every shower (guidance on domestic ventilation from the Building Regulations). If your bathroom lacks an extractor fan, install one before panels are fitted.
Temperature fluctuations stress the sealant. A bathroom that swings from 15°C in winter to 30°C in summer experiences more thermal expansion and contraction. Maintain consistent bathroom temperature if possible.
Hard water deposits can degrade sealant over time. Wipe down sealant with a soft cloth after showers to remove water droplets and mineral residue.
Chemical exposure from cleaning products can damage sealant. Avoid bleach-based cleaners; use mild soap and water instead.
Direct sunlight through bathroom windows accelerates UV degradation. Consider installing blinds or frosted film to reduce UV exposure.
Monitoring for Water Ingress Behind Panels
Check for soft spots on the wall below the panels. If it feels soft or spongy, water has saturated the substrate.
Look for discolouration or staining. Water stains appear as darker patches on the wall or on the back of the panels.
Smell for mustiness. A musty odour indicates mould growth, which thrives in damp conditions.
Monitor for mould growth inside the bathroom. If mould appears on the ceiling or walls adjacent to the panelled area, moisture is accumulating.
If you detect water ingress, remove the affected panels, allow the substrate to dry completely, treat any mould with a fungicide, and re-seal the area before reinstalling panels.
Creating a Maintenance Log
Keep a simple record of sealant inspections and re-sealing work. Note the date of installation, the date of any re-sealing, and observations from inspections. This helps you identify patterns and plan maintenance more effectively. A maintenance log also provides evidence of care if you ever need to make an insurance claim for water damage.
Conclusion
Can narrow bathroom panels prevent leaks? Absolutely, if you seal them properly and maintain the sealant over time. Panel width is far less important than installation technique, substrate preparation, and long-term care. A 250mm panel sealed meticulously outperforms a 900mm panel installed carelessly.

Water ingress is prevented by silicone sealant, not by the panels themselves. Invest in quality sealant like the GP200 from Wetwall Wonders, prepare your substrate properly, and commit to annual inspections. These habits eliminate leaks entirely.
Frequently Asked Questions
Can narrow bathroom panels prevent leaks if sealed properly?
Yes, narrow bathroom panels can prevent leaks when installed correctly with proper sealing. The key is applying silicone sealant to all joints, edges, and seams. Narrow panels (250mm-300mm) actually create more seams than wider sheets, which means more opportunities for water ingress if not sealed. Using a high-quality sealant like GP200 General Purpose Silicone with fungicide and ensuring substrate preparation are critical. Proper installation technique matters more than panel width itself.
What's the best sealant for bathroom wall panels?
The best sealant for bathroom wall panels is a high-modulus silicone with fungicide and mould resistance. Look for products that are permanently flexible, fast-setting, and suitable for wet environments. GP200 General Purpose Silicone Sealant is specifically designed for bathroom applications, contains fungicide to prevent mould growth, and offers both interior and exterior protection. Apply sealant to all joints, internal corners, and edges where water could penetrate. Ensure the sealant fully bridges the gap between panels and substrate.
What installation mistakes cause bathroom panels to leak?
Common installation mistakes include poor substrate preparation (not cleaning or levelling surfaces), skipping silicone sealant on joints and edges, using insufficient adhesive, and failing to seal internal and external corners properly. Narrow panels require extra care because more seams mean more potential leak points. Not allowing adhesive to cure fully before exposing panels to water is another frequent error. Inadequate end-cap installation and missing trim profiles also compromise water-tightness. Always follow manufacturer instructions and allow proper curing times.
Do narrow bathroom panels work in tight spaces without leaving gaps?
Narrow panels (250mm-300mm) are excellent for tight ensuite spaces and small bathrooms because they allow flexible layout options and minimise visible seams in confined areas. However, they require careful planning to avoid awkward gaps at corners and edges. Using proper trim profiles, internal corner trim, and end caps ensures a seamless finish. The trade-off is that narrow panels create more joints, so thorough sealing becomes even more important. Proper measurement and template creation before installation prevents gaps and ensures a professional result.
Narrow bathroom panels are a practical solution for small spaces, but only if you approach the installation as a sealing project first and a cladding project second. Wetwall Wonders supplies everything you need, from 250mm and 300mm narrow panels to professional-grade silicone sealant and corner trims, all designed to work together seamlessly. Start with proper surface preparation, apply quality sealant to every joint, and maintain it annually. Your bathroom will stay dry for decades.
This article was written using GrandRanker

