
How Do You Prepare Bathroom Walls for Panel Installation?
Last Updated: October 29, 2026
Quick Summary
Bathroom walls must be dry, sound, clean and flat before any adhesive touches them. Check for damp, mould and structural damage first, then prepare your specific substrate, fixing any loose plaster, paint or tiles before panels go on.
- Gather a spirit level at least 600mm long, scraper, sandpaper and cartridge gun before starting.
- Cut out soft plasterboard and patch with new moisture-resistant board, then fill and sand flush.
- Loose paint is a bond-breaker, so remove anything that peels and sand gloss and eggshell.
- Use battens rather than adhesive when walls are too uneven to fill flat.
- Get a professional assessment if walls are damp, crumbly or bowed by more than about 10mm.
Table of Contents
- Why Wall Preparation Decides Whether Your Panels Last
- Wall Panel Installation Tools and Materials to Gather First
- Step 1: Check the Wall for Damp, Mould and Structural Damage
- Step 2: Preparing Plasterboard for Bathroom Panels
- Step 3: Fixing Bathroom Wall Panels on Uneven Walls
- Step 4: Installing Shower Wall Panels Over Tiles
- Step 5: Sealing, Trimming and Checking Before You Fit Panels
- Ordering Your Panels, Adhesive and Sealant in One Go
- Frequently Asked Questions
Why Wall Preparation Decides Whether Your Panels Last
A panel is only as good as the wall behind it. If you want to know how to prepare bathroom walls for panel installation, the short answer is this: bathroom walls must be dry, sound, clean and flat before any adhesive touches them. Skip that, and even good panels will fail.
We supply panels, adhesives and silicones.
Below, we walk through the tools you need, then five steps in order. Each step builds on the last, so do not jump ahead.
Wall Panel Installation Tools and Materials to Gather First
Get everything on site before you start. Stopping mid-job to buy a missing tube of adhesive is how corners get cut.
For wall panel installation tools, you need:
- A spirit level, at least 600mm long
- A tape measure and pencil
- A moisture meter if you have one
- A scraper and filling knife
- Sandpaper, medium and fine grit
- A dust mask and safety glasses
- A mitre box or fine-tooth saw for trims
- A cartridge gun for adhesive and sealant
- Clean cloths and a bucket of warm water
For materials, you need panels, panel adhesive, silicone sealant and the right trims.
Step 1: Check the Wall for Damp, Mould and Structural Damage
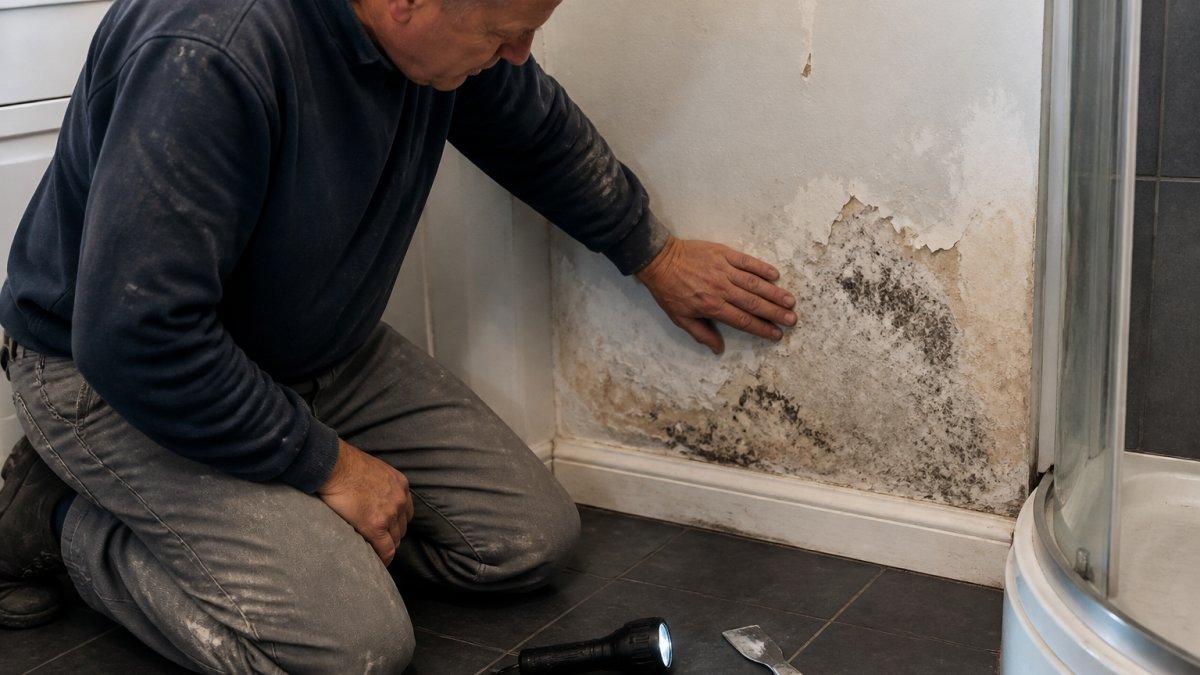
Start with a close inspection, because covering a damp wall traps the problem. Run your hand over the surface. Press on any soft patches. Look for tide marks, bubbling paint and dark spots near the floor and around the shower.
Any of these means stop and deal with it first:
- Crumbling plaster that gives under light pressure
- Dark patches that smell musty
- Lifting paint or wallpaper that peels away easily
- Loose tiles that sound hollow when tapped
- Water staining spreading from a pipe or the shower tray
If the damp traces back to a leak, fix the leak before anything else. Panels are not a repair. They are a finish.
Check your service points too. Note where pipes, cables and isolator valves sit. You will need to cut around them or bring them forward, and it is far easier to plan that now than after the first panel is stuck.
Step 2: Preparing Plasterboard for Bathroom Panels
Plasterboard is the most common bathroom substrate, but it is not the only one, and the preparation differs by surface. This step covers plasterboard in detail, then gives you the specific method for plaster, painted walls, masonry and existing tiles so you are not guessing when your wall is not board.
Plasterboard
Plasterboard needs a firm, dry base before panels go on. When preparing plasterboard for bathroom panels, the aim is a sealed surface that adhesive can grip.
Work through this checklist:
- Cut out any soft or crumbling board and patch with new moisture-resistant board
- Fill screw holes and dents with filler, then sand flush
- Scrape off loose paint and flaking skim
- Wipe down with a damp cloth to remove dust and grease
- Let the wall dry fully before fitting
Watch out: painting over mould does not fix it. If mould keeps returning, the moisture source is still active and panels will not solve it.
Plaster
Older plaster is often sound but dusty and slightly uneven. Scrape back any flaking skim, fill hollows with a suitable filler, sand flush and dust off. Test for hollow, drummy patches by tapping; cut out and patch any that move. Seal the whole wall with a primer before fitting, because plaster dust stops adhesive keying.
Painted walls
Paint is a bond-breaker if it is loose. Score a cross-hatch in a few places and try to lift the paint with a scraper. Anything that peels must come off. Gloss and eggshell need a light sand to give the adhesive a key. Emulsion that is firmly stuck can stay, but wash it with a degreaser first and let it dry.
Masonry and blockwork
Masonry is rarely flat enough for direct fixing. Fill deep mortar joints and hollows with a suitable filler or render patch, then sand or rub back. Masonry is also porous, so seal it with a primer before adhesive. If the wall is very uneven, go to Step 3 and use battens rather than trying to fill it flat.
Existing tiles
Tiles can stay if they are sound, flat and firmly stuck. Tap every tile; any that sound hollow or move must come off and be patched. Scrub with a degreaser to remove soap film, rinse and dry fully, then sand glossy tiles lightly so adhesive can key. Fill deep grout lines with filler to give a flat face. The full method is in Step 4.
Decorwall Panel Adhesive pro (310 ml) →
Preparation differs by surface, so here is what each substrate needs before panels go on.
| Surface | What to do | Watch out for |
|---|---|---|
| Plasterboard | Cut out soft board, fill holes, sand flush, wipe dust | Painting over mould does not fix it |
| Plaster | Scrape flaking skim, fill hollows, sand, prime whole wall | Plaster dust stops adhesive keying |
| Painted walls | Remove loose paint, sand gloss and eggshell, degrease emulsion | Loose paint is a bond-breaker |
| Masonry and blockwork | Fill joints and hollows, rub back, seal with primer | Rarely flat enough for direct fixing |
| Existing tiles | Remove hollow tiles, degrease, sand glossy tiles, fill grout lines | Tiles must be sound, flat and firmly stuck |
Step 3: Fixing Bathroom Wall Panels on Uneven Walls
Bathroom wall panels on uneven walls need a flat base, not a thick smear of adhesive. Adhesive bridges small dips. It cannot fix a wall that bows.
Check flatness properly
Hold a 600mm spirit level or straight edge against the wall in several directions: vertically, horizontally and diagonally. Slide a feeler gauge or a thin offcut under it.
Choose your method
Battens sit further off the wall, so plan your trim depth to match. If you use battens, check for pipes and cables first: use a cable and pipe detector before drilling, keep fixings clear of service zones and never drill blind into a wall you have not scanned.
When to stop and call a professional
If the wall is damp, crumbly or bowed by more than about 10mm across a panel width, or if you find loose plaster over a large area, get a professional assessment before covering it. Panels hide problems; they do not fix them.
Step 4: Installing Shower Wall Panels Over Tiles
You can fit panels over existing tiles, provided the tiles are sound. When installing shower wall panels over tiles, the old surface must be flat, clean and firmly stuck.
Test every tile by tapping. Any that sound hollow or move under your hand must come off and be patched. Then:
- Scrub the tiles with a degreaser to remove soap film
- Rinse and let them dry completely
- Sand glossy tiles lightly so adhesive can key to them
- Fill the grout lines with filler if they are deep, to give a flat face
- Apply adhesive in vertical beads and press the panel firmly home
Glossy ceramic is the hardest surface to bond to, so do not skip the sanding. For a full walkthrough of this method, read our guide on installing bathroom panels over existing tile.
Step 5: Sealing, Trimming and Checking Before You Fit Panels
Sealing is what keeps water out, so treat it as part of the build, not a finishing touch. Check every joint before you call the job done.
Run a continuous silicone bead along the base of the panels, around the shower tray and at internal corners. Use a silicone with fungicide for wet areas. Smooth the bead with a wet finger or a profiling tool in one pass.
Fit trims and end caps to close off exposed edges. Joining trims cover the gap between two panels. End caps finish the outer edge. Use a bead of silicone inside the trim before you push it on.
Then check:
- Every panel sits flush, with no rocking when pressed
- Joints are tight and even
- Silicone is continuous, with no thin spots
- Trims are seated fully, with no gaps at the corners
For a detailed method, see how to waterproof bathroom wall panel seams.
Ordering Your Panels, Adhesive and Sealant in One Go
Our range includes panel widths of 250mm, 300mm, 500mm and 900mm, as well as Dumawall tile effect and Linerio slatwall.
For adhesive, Decorwall Panel Adhesive Pro is a water-based option that bonds to most surfaces. For sealing, GP200 General Purpose Silicone Sealant contains fungicide and is suitable for sealing and waterproofing in areas of high humidity.


Wetwall Wonders offers panels, adhesives, silicones and trims, with panel widths of 250mm, 300mm, 500mm and 900mm. Search Wetwall Wonders for products for your project.
Frequently Asked Questions
Do bathroom walls need to be completely flat before fitting wall panels?
Not perfectly flat, but they need to be flat enough that panels sit without rocking or flexing. Small hollows of 2-3mm are usually fine with a bead of adhesive bridging the gap. Anything deeper needs filling or battening, because a panel that flexes over a hollow will eventually crack its sealant line and let water behind it. Check with a straight edge or spirit level held vertically and horizontally across the wall before you commit to adhesive.
Can you install bathroom wall panels over existing tiles?
Yes, installing shower wall panels over tiles is common, provided the tiles are firmly fixed and the surface is degreased. Scrape off loose grout, remove any blown or hollow tiles, then clean with a degreasing cleaner and rinse. Glossy tiles need a key so adhesive can grip. Avoid tiling over tiles that are already lifting, and never panel over a tiled wall with damp behind it, because you will trap the moisture and the panels will fail.
Can bathroom wall panels be fitted over damp walls?
No. Damp must be found and fixed before any panel goes up. Panels trap moisture against the substrate, so a damp wall will keep deteriorating out of sight and mould will spread behind the panel. Trace the source first: failed grout, a leaking shower valve, a blocked extractor or a bridged damp course. Let the wall dry fully, treat any mould, then apply a suitable primer or tanking membrane before fitting.
Do you need to remove old adhesive before fitting bathroom panels?
Yes, any high spots of old adhesive or tile cement must come off. Adhesive needs a continuous, even surface to bond to, and lumps of old grab adhesive stop the panel sitting flush. Use a scraper or wall scraper to take off raised residue, then sand or fill any hollows it leaves behind. Flat, sound and dust-free is the standard, and a quick wipe-down with a damp cloth after sanding stops dust weakening the bond.


