
Can You Install Bathroom Panels Over Existing Tile?
Table of Contents
- Can You Install Bathroom Panels Over Existing Tile? The Short Answer
- How to Prepare Tiles for Wall Panels: A Step-by-Step Check
- What Is the Best Adhesive for Bathroom Wall Panels Over Tiles?
- How to Install Bathroom Panels Over Tiles: The 6-Step Process
- When NOT to Install Over Tiles: Spotting the Deal-Breakers
- Bathroom Wall Panel Installation Cost: What to Budget
- Conclusion: Is Over-Tiling the Right Call for Your Bathroom?
- Frequently Asked Questions
Last Updated: September 7, 2026
Can You Install Bathroom Panels Over Existing Tile? The Short Answer
Yes, you can install bathroom panels over existing tile, provided the current surface is sound, flat, and free from moisture damage, so the answer to "can you install bathroom panels over existing tile" is a qualified yes. This approach skips the messy job of removing old ceramics. At Wetwall Wonders, we supply the panels and adhesives for this renovation.
Panels are not a cover-up for a failing wall; they are a new cladding layer that bonds directly to the tile face. If the tiles are cracked, hollow, or hiding damp, the problems will migrate through to your new surface. Preparation determines whether your installation lasts a decade or fails within a year.
How to Prepare Tiles for Wall Panels: A Step-by-Step Check
Preparing tiles for wall panels demands honesty about the condition of your existing surface. The tile face must be clean, dry, and structurally bonded to the wall behind it. The real risk is what you cannot see: damp migrating through the grout or behind the tiles. Covering a damp wall traps moisture and guarantees mould growth within months.
Step 1: The 48-Hour Moisture Barrier Test
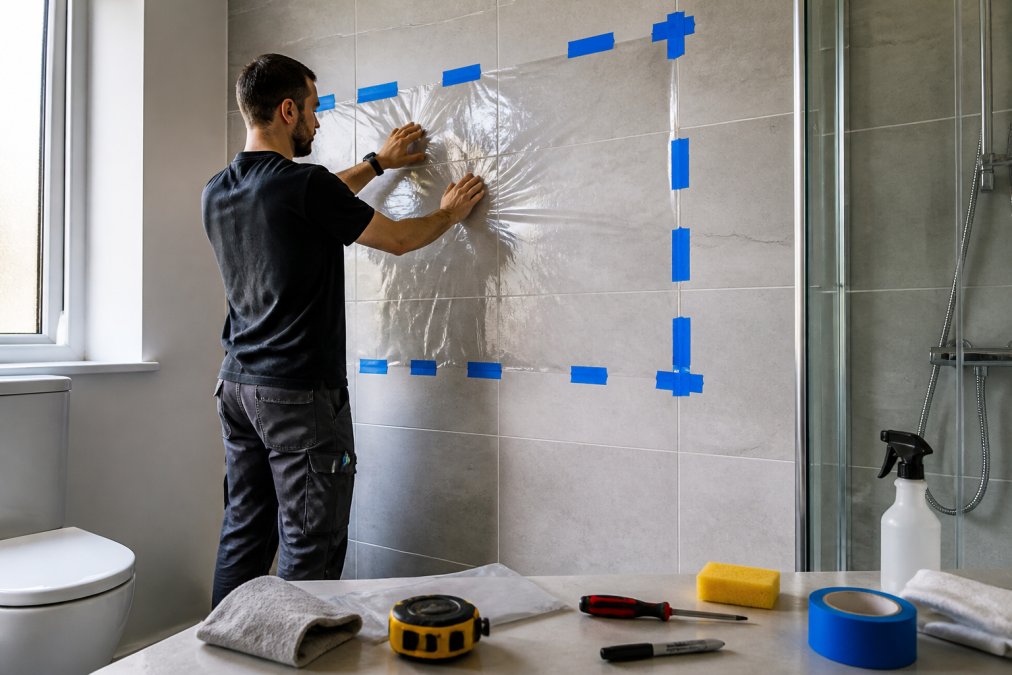
Before you pick up a sponge, run a moisture barrier test. Tape a 300mm x 300mm square of clear polythene sheeting to the tiled wall, sealing all four edges. Leave it for 48 hours (gov.uk). If condensation forms on the underside, or the tile face darkens, you have active moisture migrating through the substrate, indicating a failed tanking membrane or a pipework leak. Do not proceed until the source is traced and fixed.
Step 2: The Tap Test and Grout Inspection
Tap every tile with a plastic handle or knuckle. A solid sound means a good bond; a hollow ring suggests adhesive failure. Pay particular attention around the shower valve and pipe penetrations. Inspect grout lines: dark or blackened grout indicates chronic moisture retention. Scrape out a sample with a grout rake; if it crumbles to a dark, damp powder, strip back to the substrate, fit a cementitious backer board, and tank the area before installing panels.
Step 3: Flatness and Profile Check
Run a 2-metre straight edge across the surface in both directions. Panels do not bend to follow contours, so any deviation greater than 3mm will show as a visible seam. The existing tiles have already built the wall out by 10-15mm, so your new panel surface will sit proud of architraves, window reveals, or door frames. Plan for transition trims at these junctions before you start: measure the reveal depth and order an appropriate PVC trim profile.
Step 4: Degreasing and Keying the Surface
Once the surface is sound and dry, degrease the tiles, especially in a shower enclosure where soap scum accumulates. Wash with a strong sugar soap solution and rinse thoroughly; any residue compromises adhesive bonding. For high-gloss ceramic or porcelain tiles, lightly sand the face with 80-grit sandpaper to create a mechanical key. This is not optional for polished finishes.
Step 5: Filling Grout Lines
Deep or recessed grout lines create an uneven plane and can telegraph through the panel surface. Fill them flush with a rapid-set filler or thin tile adhesive, using a wide filling knife to keep the surface level with the tile face. Allow to cure fully before sanding smooth.
Once the surface passes the moisture, tap, and flatness checks, you are ready for adhesive selection. Preparation is about proving the substrate is stable enough to accept a new cladding layer without trapping moisture or hiding structural failure.
What Is the Best Adhesive for Bathroom Wall Panels Over Tiles?
The best adhesive for bathroom wall panels over tiles is a dedicated panel adhesive, not a standard tiling adhesive, which is formulated for porous ceramic and does not grip a non-porous, glazed tile surface as well.
We recommend a water-based panel adhesive designed to bond to non-porous surfaces. The Decorwall Panel Adhesive Pro is our go-to product: it bonds within one hour and cures fully in 24 hours. Its white colour blends seamlessly behind light-coloured panels.

Where moisture is a persistent concern, the hybrid polymer Decorwall Megabond Adhesive bonds many surfaces and retains its grip even when applied under water, making it a reliable choice for shower enclosures and wet zones.
| Adhesive | Best For | Cure Time | Price |
|---|---|---|---|
| Decorwall Panel Adhesive Pro | Standard tile-to-panel bonding | 24 hours | £9.00 per 310ml |
| Decorwall Megabond Adhesive | High-moisture areas, tricky surfaces | 24 hours | £9.00 per 295ml |
How to Install Bathroom Panels Over Tiles: The 6-Step Process
Installing panels over tiles follows the same core method as fitting to plasterboard, with one critical difference: the existing tiles have added 10-15mm of thickness to your walls. This changes how you handle corners, edges, and transitions. A panel installation on bare plasterboard sits flush with architraves; an installation over tiles sits proud of them. Planning for these transitions before cutting your first panel is the difference between a professional finish and a DIY bodge.
Step 1: Dry-Fit and Plan Your Transitions
Measure your wall and cut the panels to size, accounting for a 2-3mm expansion gap at top, bottom, and sides. Use a fine-toothed saw for clean cuts. Dry-fit every panel before applying adhesive. At internal corners, butt panels together with a silicone-filled joint or use an internal corner trim; the tile build-out makes a trim profile the cleaner option. At external corners and window reveals, measure the tile build-out depth and order a trim that bridges the difference. Do not force a standard trim into a non-standard gap.
Step 2: Apply the Adhesive Correctly
Run the Decorwall Panel Adhesive Pro in vertical beads 10-15cm apart along the panel back, with two continuous beads along each edge for a full seal at the joints. Do not use a solid spread; it traps air and creates hollow spots. Press the panel firmly into place. For panels wider than 600mm, apply adhesive to the wall as well.
Step 3: Fix the First Panel with Precision
Start in a corner, using a spirit level to guarantee the panel is plumb; an out-of-true start compounds across the wall. Use temporary support wedges at the base while the adhesive grabs. If the panel sits proud of an adjoining surface, confirm your trim profile fits before the adhesive cures.
Step 4: Connect Subsequent Panels with a Waterproof Joint
Use the tongue and groove joint system. Apply a bead of silicone sealant into the groove before sliding the next panel home, wiping away excess immediately. The sealant in the joint is your primary waterproofing defence, not the panel surface. A continuous, unbroken bead along the full groove length is non-negotiable; if you break it, stop and reapply.
Step 5: Allow the Adhesive to Cure
The panel adhesive requires 24 hours to reach full strength (peer-reviewed research). Do not load shelves or shower fittings during this period. The adhesive cures by moisture evaporation, so keep the room ventilated but not subject to direct water spray. Do not run the shower for at least 24 hours after the final panel is fixed.
Step 6: Seal Every Edge and Transition Point
Run a bead of GP200 General Purpose Silicone Sealant along every edge, internal corner, and around pipe penetrations. This final seal keeps moisture out of the wall cavity. At external corners and window reveals, seal between the panel and trim, and between the trim and adjacent surface; do not rely on the trim alone. For pipe penetrations, use a silicone-compatible pipe collar or cut a neat hole and seal generously. Allow 24 hours to skin over before exposing to water.

The installation process over tiles is not fundamentally different from fitting to a bare wall, but the geometry changes everything. The tile build-out affects corners, reveals, and fittings. Plan for these transitions, measure the depths, and order the correct trim profiles before you begin.
When NOT to Install Over Tiles: Spotting the Deal-Breakers
There are four scenarios where installing over tiles will fail, and each requires you to strip back to the substrate instead.
First, unstable tiles: if more than a small patch sounds hollow, the bond has failed and the weight of new panels will accelerate the problem. Second, moisture ingress: water staining on grout, a musty smell, or visible mould indicates damp that must be traced and fixed before any new cladding goes up.
Third, severe wall flatness issues: if your wall bows by more than a few millimetres across a panel width, the panels will not sit flush and the joints will gap. Fourth, structural weight: a full wall of panels plus adhesive adds measurable load, and on failing plasterboard this can pull the entire surface away.
Bathroom Wall Panel Installation Cost: What to Budget
Bathroom wall panel installation cost varies significantly depending on whether you DIY or hire a fitter. The panels themselves are the largest variable, scaling with finish quality and board size.
The adhesive and sealant are a core line item, not an afterthought. The Decorwall Panel Adhesive Pro costs £9.00 per 310ml cartridge, and a typical shower enclosure requires two to three cartridges. The GP200 silicone sealant is sold in packs of three for £24.00, and you will use at least one pack for a standard enclosure.
When budgeting, factor in these essentials:
- Panels sized to your wall dimensions
- Panel adhesive at roughly one cartridge per 3-4 square metres
- Silicone sealant for all joints, edges, and corners
- Trim profiles for internal and external corners
- Sugar soap and cleaning materials for surface degreasing
For a DIY installation, the material cost is typically a fraction of a full re-tile, which involves not only new tiles but also adhesive, grout, backer board, and the labour to remove the old surface. The UK Government construction guidance on bathroom refurbishment notes that proper surface preparation is essential to avoid costly structural repairs later.
Conclusion: Is Over-Tiling the Right Call for Your Bathroom?
Installing panels over existing tile is a legitimate, durable solution when the substrate is sound, clean, and flat. It saves the mess and expense of demolition, and modern wall panels offer better moisture resistance and easier maintenance than grouted tile. If your tiles pass the tap test, dry test, and flatness check, you can proceed with confidence.
The process fails when homeowners rush past preparation or use the wrong adhesive. A dedicated panel adhesive for non-porous surfaces, combined with a thorough silicone seal on every edge, is the difference between a waterproof installation and one that harbours mould.
At Wetwall Wonders, we supply everything you need in one order: panels in sizes from 250mm to 900mm, including tile-effect and slatwall styles, plus the adhesives, silicones, and trims. No chasing supplies across multiple suppliers and no compatibility guesswork. Get started with Wetwall Wonders and transform your tiled bathroom into a modern, maintenance-free space.
Frequently Asked Questions
Do I need to prime old tiles before installing wall panels?
Priming is not usually essential, but it helps in specific cases. If your tiles are very shiny or glazed, a primer improves the adhesive bond. More importantly, the tiles must be clean, dry, and free of grease. Wash them with a degreasing cleaner, rinse, and let them dry completely before you start. If you have any loose or hollow-sounding tiles, fix them first. Skipping this preparation is the most common cause of panels failing to bond properly.
What are the downsides of installing shower wall panels over tiles?
The main downsides are added wall thickness and weight. Panels plus adhesive will push your tiles out by roughly 10-14mm, which affects how trims and fittings sit. You may need to extend pipework or adjust the shower enclosure. The combined weight of tiles and panels also stresses the wall structure, so it must be sound. Finally, if the existing tiles are uneven, the panels will telegraph the imperfections, so check for wall flatness first.
What is the best adhesive for bathroom wall panels over tiles?
A strong, water-based panel adhesive is the right choice. Look for a product specifically designed for bonding panels to difficult surfaces, like Decorwall Panel Adhesive Pro. It creates a strong bond, is ready in about one hour, and cures fully in 24 hours. For areas that get very wet, a hybrid polymer adhesive like Decorwall Megabond is also a good option. Avoid using standard tiling adhesive, which is not designed for this job.
Will bathroom wall panels over tiles stop mold and moisture problems?
Yes, provided the installation is done correctly. Wall panels are moisture-resistant and non-porous, which makes them a hygienic surface that is easier to keep clean than grout lines. The key is to seal all edges and joints properly with a mould-resistant silicone sealant. This creates a waterproof seal that stops water from getting behind the panels. If water did get behind them, it could get trapped between the panel and the old tile, so a thorough seal is critical.

